
1984 silver series 3
-
codge
- RX7fb LEGEND

- Posts: 2668
- Joined: Fri Apr 01, 2011 11:41 am
- Location: South Yorks.
- Been thanked: 4 times
Re: 1984 silver series 3 ... off the road since 1992
Beautiful job Ian....still, we expect nothing less from you.
-
Chud
- VIP User

- Posts: 933
- Joined: Fri Apr 01, 2011 7:35 am
- Location: North Dorset, UK
- Has thanked: 3 times
- Been thanked: 111 times
Re: 1984 silver series 3 ... off the road since 1992
Awesome
instagram: tymboooo
1980 series 1 RX7 x2
1983 series 2 RX7
1975 RX3 Coupe
1956 VW split screen kombi
1966 Porsche 912
1980 series 1 RX7 x2
1983 series 2 RX7
1975 RX3 Coupe
1956 VW split screen kombi
1966 Porsche 912
-
threespires
- Posts: 5
- Joined: Sun Jan 01, 2012 12:36 am
- Location: Midlands UK
Re: 1984 silver series 3 ... off the road since 1992
Hello Ian, the car is looking lovely. Well done on your hard work. I must jump in the Isetta and pop over and see you soon.
Colour - I hope your head over-rules your heart and the original Sunbeam Silver is retained....
Regards - Robert
Colour - I hope your head over-rules your heart and the original Sunbeam Silver is retained....
Regards - Robert
-
Casey

- Admin

- Posts: 1337
- Joined: Sat May 07, 2011 5:46 pm
- Location: Colchester, UK
- Has thanked: 512 times
- Been thanked: 455 times
Re: 1984 silver series 3 ... off the road since 1992
Fantastic work Ian, an inspiration as work progresses slowly, but surely, with Kimi 
KIMI 1 : 1st Gen, "hybrid" 1983 silver S2 running gear in a 1985 S3 shell, SORN'd, long term resto project
KIMI 2 : 1st Gen, 1983 silver S2 - now sold to Ian Mothersole on here.
KIMI 3 : 1st Gen, 1983 red S3
Plus a 2004 Full Bridgeported RX-8
KIMI 2 : 1st Gen, 1983 silver S2 - now sold to Ian Mothersole on here.
KIMI 3 : 1st Gen, 1983 red S3
Plus a 2004 Full Bridgeported RX-8
-
ian65

- Admin
- Posts: 6402
- Joined: Wed Mar 30, 2011 12:11 am
- Has thanked: 315 times
- Been thanked: 376 times
Re: 1984 silver series 3 ... off the road since 1992
thanks guys, it's coming together... a bit slower than I hoped due to work getting in the way.
Robert, you're welcome to come over any time, I'll email you my phone numbers and we'll arrange something.....and it's staying it's original colour!
Robert, you're welcome to come over any time, I'll email you my phone numbers and we'll arrange something.....and it's staying it's original colour!
1999 Jaguar XJR V8 Supercharged
1992 Peugeot 205 1.9 GTI
2003 Mercedes SLK 200 Kompressor
-
ian65
- Admin
- Posts: 6402
- Joined: Wed Mar 30, 2011 12:11 am
- Has thanked: 315 times
- Been thanked: 376 times
Re: 1984 silver series 3 ... off the road since 1992
Its been a while since I last updated this thread, mainly because I haven’t had much free time to devote to this project....... over the last few weeks however, I have made a bit of progress.
The engine bay has now been stripped, resprayed and lacquered and I’ve started building it back up again. The steering box has gone back in, together with a change of steering column to fit the PAS....
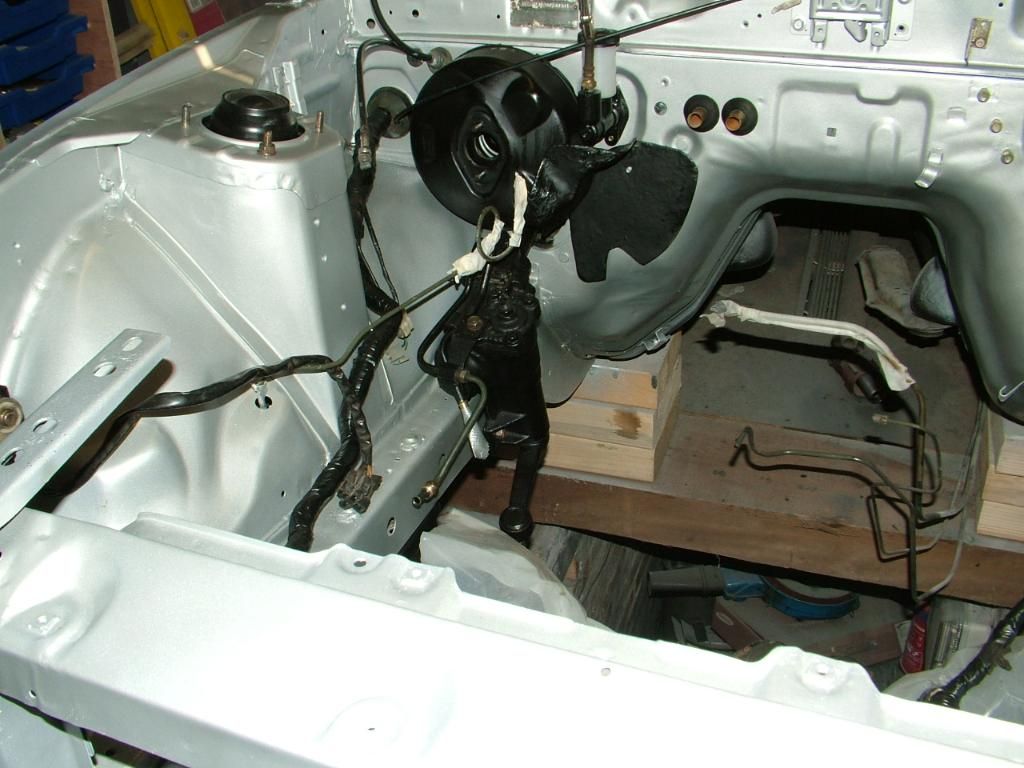
Next up, I’ve rebuilt the front suspension, repainted all the metal bits with POR15 satin and rebushed the lot with Respeed polys....


I pressed new bottom ball joints into the control arms and treated them to new poly bushes as well....
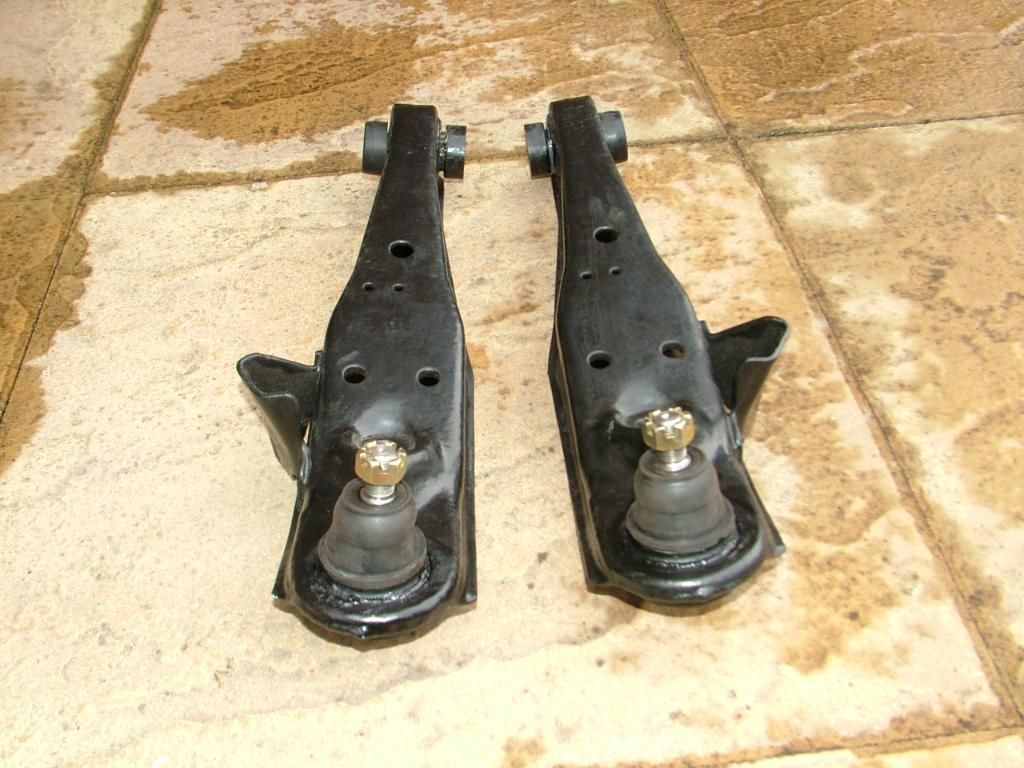
Had the brake discs re-skimmed and rebuilt the front suspension legs with all the new/freshly painted parts....


After putting the front beam back into the car, the rest of the front suspension was installed and the car was rolling again.
I took a load of photos of the next things I did but can’t find them at the moment.....
You’ll have to take my word for it that I cleaned the outside of the gearbox back to clean metal and got rid of years of old oil and grease then fitted a new release bearing and put the gearbox back into the car.


As I have ongoing house renovations and need my garage clear, the car was then rolled outside in the fresh air...... this has given me a bit more space to move around it.
Meanwhile, back in the garage....................................................
The sump was removed from the engine so that I could fit the Elford sump in its place....

The Elford sump differs from the standard item as it has an oil return fitted into its side which takes receives the oil that’s passed through the turbo....

A couple of beads of RTV silicon, one inside the bolts and one outside and the sump went back on....

The engine was then refitted to the car..... can’t find the photos at the moment though
The turbo setup was prepped ready to fit to the engine. The wastegate was very stiff, probably from 30 years of extreme heat and soot so I stripped it all down, gave it a good clean and lubricated it....


The spring pressure in the actuator keeps the swing valve pressed against the hole in the sandwich plate until such time that the pressure from the turbo overcomes the spring in the actuator and the swing valve opens to let the exhaust gas bypass the turbo and reduce the boost...


The swing valve on my setup was extremely stiff and I doubt if it would have worked properly. I wonder how many more Elfords are driving around with seized wastegates?
It’s all very free and smooth now so should work trouble free.
When I installed the Elford setup onto my black series 3 RX7 last year, I found that the easiest way to do it was to bolt the inlet manifold to the engine, then put the downpipe onto the turbo and manifold and then put the turbo and manifold onto the engine last.
So I put the inlet onto the block and put the downpipe onto the turbo....
For anyone interested in having a look around an Elford turbo setup, here it is....


Here it is with the oil return pipe bolted to the bottom of the turbo....


So far, so good....................................... until I came to put the turbo and manifold onto the engine.
As this car is fitted with power steering, the steering box and hydraulic lines take up just a little bit more room than the standard box and with the inlet already bolted onto the engine, there was no way that the turbo and manifold was going to go in.
After a good half hour struggling, swearing and cutting my knuckles, I conceded defeat, took the inlet, the downpipe and the servo heat shield off. Even with these out of the way, it was a bloody tight fit.
As seen here, there ain’t much room to play....


However, eventually, on it went, the inlet and downpipe went back on and all was good....


Finally, I put a new set of plugs in it.... just because it was easy, pain free progress!


And that’s as far as I’ve got....... next jobs are to finish rebinding the loom and connect the electrics, cooling system, exhaust, starter, oil cooler, ignition control, etc etc etc.....................
The engine bay has now been stripped, resprayed and lacquered and I’ve started building it back up again. The steering box has gone back in, together with a change of steering column to fit the PAS....
Next up, I’ve rebuilt the front suspension, repainted all the metal bits with POR15 satin and rebushed the lot with Respeed polys....
I pressed new bottom ball joints into the control arms and treated them to new poly bushes as well....
Had the brake discs re-skimmed and rebuilt the front suspension legs with all the new/freshly painted parts....
After putting the front beam back into the car, the rest of the front suspension was installed and the car was rolling again.
I took a load of photos of the next things I did but can’t find them at the moment.....
You’ll have to take my word for it that I cleaned the outside of the gearbox back to clean metal and got rid of years of old oil and grease then fitted a new release bearing and put the gearbox back into the car.
As I have ongoing house renovations and need my garage clear, the car was then rolled outside in the fresh air...... this has given me a bit more space to move around it.
Meanwhile, back in the garage....................................................
The sump was removed from the engine so that I could fit the Elford sump in its place....
The Elford sump differs from the standard item as it has an oil return fitted into its side which takes receives the oil that’s passed through the turbo....
A couple of beads of RTV silicon, one inside the bolts and one outside and the sump went back on....
The engine was then refitted to the car..... can’t find the photos at the moment though
The turbo setup was prepped ready to fit to the engine. The wastegate was very stiff, probably from 30 years of extreme heat and soot so I stripped it all down, gave it a good clean and lubricated it....
The spring pressure in the actuator keeps the swing valve pressed against the hole in the sandwich plate until such time that the pressure from the turbo overcomes the spring in the actuator and the swing valve opens to let the exhaust gas bypass the turbo and reduce the boost...
The swing valve on my setup was extremely stiff and I doubt if it would have worked properly. I wonder how many more Elfords are driving around with seized wastegates?
It’s all very free and smooth now so should work trouble free.
When I installed the Elford setup onto my black series 3 RX7 last year, I found that the easiest way to do it was to bolt the inlet manifold to the engine, then put the downpipe onto the turbo and manifold and then put the turbo and manifold onto the engine last.
So I put the inlet onto the block and put the downpipe onto the turbo....
For anyone interested in having a look around an Elford turbo setup, here it is....
Here it is with the oil return pipe bolted to the bottom of the turbo....
So far, so good....................................... until I came to put the turbo and manifold onto the engine.
As this car is fitted with power steering, the steering box and hydraulic lines take up just a little bit more room than the standard box and with the inlet already bolted onto the engine, there was no way that the turbo and manifold was going to go in.
After a good half hour struggling, swearing and cutting my knuckles, I conceded defeat, took the inlet, the downpipe and the servo heat shield off. Even with these out of the way, it was a bloody tight fit.
As seen here, there ain’t much room to play....
However, eventually, on it went, the inlet and downpipe went back on and all was good....
Finally, I put a new set of plugs in it.... just because it was easy, pain free progress!
And that’s as far as I’ve got....... next jobs are to finish rebinding the loom and connect the electrics, cooling system, exhaust, starter, oil cooler, ignition control, etc etc etc.....................
1999 Jaguar XJR V8 Supercharged
1992 Peugeot 205 1.9 GTI
2003 Mercedes SLK 200 Kompressor
-
A7RXY

- VIP User
- Posts: 1343
- Joined: Fri Apr 01, 2011 6:55 am
- Location: Upminster, Essex UK
- Has thanked: 157 times
- Been thanked: 61 times
Re: 1984 silver series 3 ... off the road since 1992
Hi Ian all looking good, great photos of the turbo wastegate set up I'm sure that will help me out when I get that far.
Dibs
Dibs
-
spoddy
- VIP User
- Posts: 1027
- Joined: Sun Jun 19, 2011 10:39 pm
- Location: N.Ireland
- Been thanked: 1 time
Re: 1984 silver series 3 ... off the road since 1992
were any elford setup cars ever installed with power steering?
would the turbo heat now the heat shield is off greatly affect any of the steering column parts?
at least you have it all in now, minus a few knuckles. it's looking real good and you make it look so easy ian.
would the turbo heat now the heat shield is off greatly affect any of the steering column parts?
at least you have it all in now, minus a few knuckles. it's looking real good and you make it look so easy ian.
-
ian65
- Admin
- Posts: 6402
- Joined: Wed Mar 30, 2011 12:11 am
- Has thanked: 315 times
- Been thanked: 376 times
Re: 1984 silver series 3 ... off the road since 1992
dunno Ronnie, this is all unchartered territory because this is the only UK car with factory right hand drive power steering and so also the only elford with factory pas.spoddy wrote:were any elford setup cars ever installed with power steering?
would the turbo heat now the heat shield is off greatly affect any of the steering column parts?
at least you have it all in now, minus a few knuckles. it's looking real good and you make it look so easy ian.
I might have to make up a heatshield out of a bit of stainless to deflect the heat
1999 Jaguar XJR V8 Supercharged
1992 Peugeot 205 1.9 GTI
2003 Mercedes SLK 200 Kompressor
-
Steve-A

- VIP User
- Posts: 560
- Joined: Thu Mar 31, 2011 11:20 pm
- Location: Bromsgrove, Worcs
- Been thanked: 4 times
Re: 1984 silver series 3 ... off the road since 1992
Nice work Ian It's great to see this project moving on. It's always nice to be reassembling again!
Whilst it's hard to see exactly what the space is like from the pictures, if it's as close as it looks then I too would be thinking of heat shielding the power steering and brake components.
Whilst it's hard to see exactly what the space is like from the pictures, if it's as close as it looks then I too would be thinking of heat shielding the power steering and brake components.
Ex-rotor owner exploring the world of pistons and valves....