
yes, it sounds like it's grounding out...... it's a lot of work to strip the interior but well worth it Dean to do a proper job.DKWW2000 wrote:Good work there Dean, when it is back home all together & tested it will have been worth it & you can enjoy all the hard work
If the temp goes to red as soon as you turn on ignition then it is shorting out by the sound of it
If it goes up slowly Do Not Drive
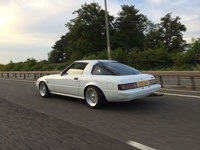
1985 Mazda RX7....Its Black!
-
ian65

- Admin

- Posts: 6402
- Joined: Wed Mar 30, 2011 12:11 am
- Has thanked: 315 times
- Been thanked: 376 times
Re: 1985 Mazda RX7....Its Black!
1999 Jaguar XJR V8 Supercharged
1992 Peugeot 205 1.9 GTI
2003 Mercedes SLK 200 Kompressor
-
DeanRX7
- VIP User

- Posts: 574
- Joined: Wed Sep 14, 2011 9:51 pm
- Location: Melb via London via Holland
- Has thanked: 39 times
- Been thanked: 63 times
Re: 1985 Mazda RX7....Its Black!
It didnt not only go red, it pointed to the sky. Only suprise I got from doing this....I didnt know the units in the passenger foot well existed until yesterday!DKWW2000 wrote:Good work there Dean, when it is back home all together & tested it will have been worth it & you can enjoy all the hard work
If the temp goes to red as soon as you turn on ignition then it is shorting out by the sound of it
If it goes up slowly Do Not Drive
1985, FB, RX7. Building the dream car.
-
gt_james
- VIP User
- Posts: 1067
- Joined: Sun Apr 06, 2014 4:10 pm
- Location: Tewkesbury UK
- Has thanked: 114 times
- Been thanked: 211 times
Re: 1985 Mazda RX7....Its Black!
Looks like good progress, your car looks pretty much identical to mine, I need to get some welding done in the same places behind the rear seats, but my upper suspension arm mounts are solid.
-
DeanRX7
- VIP User
- Posts: 574
- Joined: Wed Sep 14, 2011 9:51 pm
- Location: Melb via London via Holland
- Has thanked: 39 times
- Been thanked: 63 times
Re: 1985 Mazda RX7....Its Black!
So the tank is a new one to replace the race one (sold already) built for the car as the last owner could find a good one apparently. Here is the replacement tank which I will be reconditioning myself.


When removing the sender, the bolts broke


But I got them out!

Inside the tank which will be getting the TANK CURE treatment to remove all crap and any rust...future proofing.

Temp gaskets and covers made so as to get the chemical clean inside a proper splashing around! Who ever thought laminate floor would come in handy for my RX7!


And they are attached. I need to do this when the kids are not around so this week I hope to get it done. I have ordered new gaskets but will see if they have them in stock as the last place I ordered them from listed but didnt have them.

When taking out the interior the dash had some broken parts but with some gloopy glue as my kids call it, I made them stronger by adding some reinforcements to weaker areas.


Next was the lights which I wanted to clean up as I will be replacing my old UK ones with Euro ones, not sure if there is a difference but the refective part on the old ones where stuffed. Bolts and surrounds had all rust removed, undercoated and painted mat black, same as the plastic....they look like new!


The car is at a mechanic getting stuff I dont have the time or tools for, but I am helping.
Old and new images follow.
Welding rusty holes up!


AFTER!


The old exhaust cover is rusted through so getting a new one mage by some old local old guy!

So thats it for now. Everything that comes off the car must be rust free or replaced with new or after market parts. Will be doing the sunroof bolts with some rust remover and dremmel to clean the bolts next i think.
1985, FB, RX7. Building the dream car.
-
DKWW2000
- VIP User
- Posts: 1625
- Joined: Sun Jul 06, 2014 10:16 pm
- Location: English Riviera - South Devon
- Has thanked: 183 times
- Been thanked: 187 times
Re: 1985 Mazda RX7....Its Black!
How is the Black Beauty coming on Dean?
RX7 FB S3 - RX7 FC TII Vert
Rotaries Previously Owned:-
2 x NSU Ro 80s - 2 x S2 RX7s - Suzuki RE 5 - DKW(Hercules) W2000 - Norton (Krauser) Commander
Rotaries Previously Owned:-
2 x NSU Ro 80s - 2 x S2 RX7s - Suzuki RE 5 - DKW(Hercules) W2000 - Norton (Krauser) Commander
-
DeanRX7
- VIP User
- Posts: 574
- Joined: Wed Sep 14, 2011 9:51 pm
- Location: Melb via London via Holland
- Has thanked: 39 times
- Been thanked: 63 times
Re: 1985 Mazda RX7....Its Black!
All underneath is done..All the parts I listed in build are on. New bushed, discs, brakes, lines...all rust removed and replaced all rusted bits so its like new underneath. Getting the engine checked at rotor specialist in Holland then its time to get Dutch rego! Pictures will be updated in the next few weeks.
Thanks for asking.
Thanks for asking.
1985, FB, RX7. Building the dream car.
-
DKWW2000
- VIP User
- Posts: 1625
- Joined: Sun Jul 06, 2014 10:16 pm
- Location: English Riviera - South Devon
- Has thanked: 183 times
- Been thanked: 187 times
Re: 1985 Mazda RX7....Its Black!
Good News, perhaps give it a run to Beaulieu next July, it would be good to meet up & show it off 

RX7 FB S3 - RX7 FC TII Vert
Rotaries Previously Owned:-
2 x NSU Ro 80s - 2 x S2 RX7s - Suzuki RE 5 - DKW(Hercules) W2000 - Norton (Krauser) Commander
Rotaries Previously Owned:-
2 x NSU Ro 80s - 2 x S2 RX7s - Suzuki RE 5 - DKW(Hercules) W2000 - Norton (Krauser) Commander
-
DeanRX7
- VIP User
- Posts: 574
- Joined: Wed Sep 14, 2011 9:51 pm
- Location: Melb via London via Holland
- Has thanked: 39 times
- Been thanked: 63 times
Re: 1985 Mazda RX7....Its Black!
Im back....jeezas!!! 5 Years since I bought this car and the 2 year plan to get to this point, like usual, took longer and a bit more (dont tell the missus) money than planned.
So quick update before you see the images. Headlight issue solved by an auto electrician. The wire in the front nose which joins the two was pretty much green powder, not a wire anymore. He told me that I was lucky it didnt catch fire which considering I drove it from the UK to the Netherlands with it working, was a miracle. Engine has been serviced by one of the only rotor specialist here said the engine is really healthy. Clutch, gearbox etc are all good so sitting around or moving it from spot to spot here while not ideal, it's still a solid car. The super low King Springs I brought back from Aus on one of my trips give it a nice stance but so far, its not a big fan of speed bumps. So once I dealt with the underside, the lights and the engine, it was time to get it back home to get all the interior back in.


This is pretty much how i got it back. I tried jigsawed the insulation back together but it was old and crappy, some of it with rust and some had been damp so it all had to go.


Here I put in some sound dampening foam which had adhesive on one side then put some more underlay on top of it. As you can see, made templates by either tracing onto paper or just tracing out with chalk on the new black material which goes under the carpet.


Once all traced and cut out, they all slide into place with ease. It should be better noise cancelling than the original but now that its in, if there is a difference, I cant tell. Still, its a bit thinner than the original so the fact it overlaps here and there made no difference to the carpet going in. I was also told this material is great for moisture so as we all know, thats a good thing.


My biggest worry was getting the carpet back under the console but with the thinner insulation and adjusting some screws this was much easier than taking it out. For once, something easy!


This was a replacement carpet on another trip to Australia I bought for about 130 euro....I might as well have stuck the money in the bin. Its crap and if you want more details on this terrible replacement carpet, let me know. They advertise it as a great way to improve on the original carpet but the pile and cut are second rate at best and thanks to this forum, I was able to get a genuine replacement with some high pressure hose cleaing was a better option than the original one I had in it. I tried to dye the one I had with many different products but the fact its a synthetic nylon meant it would not take another colour or any colour. I event tried carpet paint as a last resort....looked like junk!


On the rear panel the insulation was again tatty and falling apart so once I found a new rear tailgate interior panel, i painted it the closest gray I could find, put the old carpet in the washing machine, stuck some more sound proofing stuff onto the black rear side and while its a bit more stiff, it holds the shape better on the back so looks good to me.


Back of the rear seat sanded and painted again. Good as new!


Close up of the insulation and put in seat belts for the kids in the back which again, bought from Australia at the cost of $130 Aus. I thought that was too much, maybe it is, but no way I would have the kiddos in the back without them on.

[URL=http://s1128.photobucket.com/user/RX7
These are some Euro Spec mirrors someone in Aus wanted so I sold them for 30 euros. Just thought I would add that in.


A lot of fiddling around and got the centre console and radio etc in. Took me much longer to figure it out than to actually put it in. Happy with result. Cleaned up pretty nice.


Rear quarter interior panels, painted and put new mesh under the speaker holes. I used some home improvement style knobs to cover the holes. I have since cut them and made them smaller and they will do for now.


Rear interior cleaned up and installed. See above for what I did to that panel.


From Mazda in Aus i got some small finishing bits to freshen up some rusty parts. The NOS gear shifter rubber boot was very satisfying to put in!


The seats when I bought it had no foam or support left and lucky enough I got some LHD ones from here for 40 euro total....massive bargain! I had to drill a new hole to get them in but they are much better. Only issue is that the passenger get the extra back/lumber support but its all about sharing so not an issue for me. I do still have the original seat with the extra support but will most likely make a chair for my (one day to be built) office out of it.


A super clean bumper I bought from here for 75 euro which will replace the slightly battered one it has now.


Just before I went for my Dutch MOT (APK), my wiper motor died so, on the morning of the appointment, I spent 4 hours taking bits, including the motor and threads of a LHD 1983 RX7 for my 1985 RHD set up. Got it in and it works great, so that was good.


The guy who did my brakes did some dodgy work and if you cant see it, here we have, i think, a 30cm rear brake line which curls around the axle. This in the few kms I have done has rubber the inner rim so are junk already. Lucky the APK guys didnt see it so I will wait for my plate in a few days then drive it to the mechanic and get them replaced.
Having some issues with the headlights/dash lights at the moment for some reason. still working on it as it started only a day or so ago. I will be getting a SPAL electric fan put onto the original radiator as the noise of my big plastic original white fan makes way to much noise. I want to hear the engine more! Need to find a place too re-do the original wheels with a nice fine diamond cutter and will get new tyres. Going to go for these I think.
https://www.bandenconcurrent.nl/bandenm ... 60-14-88H/
So, thats it for now....thanks for reading, comments welcomed!
So quick update before you see the images. Headlight issue solved by an auto electrician. The wire in the front nose which joins the two was pretty much green powder, not a wire anymore. He told me that I was lucky it didnt catch fire which considering I drove it from the UK to the Netherlands with it working, was a miracle. Engine has been serviced by one of the only rotor specialist here said the engine is really healthy. Clutch, gearbox etc are all good so sitting around or moving it from spot to spot here while not ideal, it's still a solid car. The super low King Springs I brought back from Aus on one of my trips give it a nice stance but so far, its not a big fan of speed bumps. So once I dealt with the underside, the lights and the engine, it was time to get it back home to get all the interior back in.


This is pretty much how i got it back. I tried jigsawed the insulation back together but it was old and crappy, some of it with rust


Here I put in some sound dampening foam which had adhesive on one side then put some more underlay on top of it. As you can see, made templates by either tracing onto paper or just tracing out with chalk on the new black material which goes under the carpet.


Once all traced and cut out, they all slide into place with ease. It should be better noise cancelling than the original but now that its in, if there is a difference, I cant tell. Still, its a bit thinner than the original so the fact it overlaps here and there made no difference to the carpet going in. I was also told this material is great for moisture so as we all know, thats a good thing.


My biggest worry was getting the carpet back under the console but with the thinner insulation and adjusting some screws this was much easier than taking it out. For once, something easy!


This was a replacement carpet on another trip to Australia I bought for about 130 euro....I might as well have stuck the money in the bin. Its crap and if you want more details on this terrible replacement carpet, let me know. They advertise it as a great way to improve on the original carpet but the pile and cut are second rate at best and thanks to this forum, I was able to get a genuine replacement with some high pressure hose cleaing was a better option than the original one I had in it. I tried to dye the one I had with many different products but the fact its a synthetic nylon meant it would not take another colour or any colour. I event tried carpet paint as a last resort....looked like junk!


On the rear panel the insulation was again tatty and falling apart so once I found a new rear tailgate interior panel, i painted it the closest gray I could find, put the old carpet in the washing machine, stuck some more sound proofing stuff onto the black rear side and while its a bit more stiff, it holds the shape better on the back so looks good to me.


Back of the rear seat sanded and painted again. Good as new!


Close up of the insulation and put in seat belts for the kids in the back which again, bought from Australia at the cost of $130 Aus. I thought that was too much, maybe it is, but no way I would have the kiddos in the back without them on.

[URL=http://s1128.photobucket.com/user/RX7
These are some Euro Spec mirrors someone in Aus wanted so I sold them for 30 euros. Just thought I would add that in.


A lot of fiddling around and got the centre console and radio etc in. Took me much longer to figure it out than to actually put it in. Happy with result. Cleaned up pretty nice.


Rear quarter interior panels, painted and put new mesh under the speaker holes. I used some home improvement style knobs to cover the holes. I have since cut them and made them smaller and they will do for now.


Rear interior cleaned up and installed. See above for what I did to that panel.


From Mazda in Aus i got some small finishing bits to freshen up some rusty parts. The NOS gear shifter rubber boot was very satisfying to put in!


The seats when I bought it had no foam or support left and lucky enough I got some LHD ones from here for 40 euro total....massive bargain! I had to drill a new hole to get them in but they are much better. Only issue is that the passenger get the extra back/lumber support but its all about sharing so not an issue for me. I do still have the original seat with the extra support but will most likely make a chair for my (one day to be built) office out of it.


A super clean bumper I bought from here for 75 euro which will replace the slightly battered one it has now.


Just before I went for my Dutch MOT (APK), my wiper motor died so, on the morning of the appointment, I spent 4 hours taking bits, including the motor and threads of a LHD 1983 RX7 for my 1985 RHD set up. Got it in and it works great, so that was good.


The guy who did my brakes did some dodgy work and if you cant see it, here we have, i think, a 30cm rear brake line which curls around the axle. This in the few kms I have done has rubber the inner rim so are junk already. Lucky the APK guys didnt see it so I will wait for my plate in a few days then drive it to the mechanic and get them replaced.
Having some issues with the headlights/dash lights at the moment for some reason. still working on it as it started only a day or so ago. I will be getting a SPAL electric fan put onto the original radiator as the noise of my big plastic original white fan makes way to much noise. I want to hear the engine more! Need to find a place too re-do the original wheels with a nice fine diamond cutter and will get new tyres. Going to go for these I think.
https://www.bandenconcurrent.nl/bandenm ... 60-14-88H/
So, thats it for now....thanks for reading, comments welcomed!
1985, FB, RX7. Building the dream car.
-
DeanRX7
- VIP User
- Posts: 574
- Joined: Wed Sep 14, 2011 9:51 pm
- Location: Melb via London via Holland
- Has thanked: 39 times
- Been thanked: 63 times
Re: 1985 Mazda RX7....Its Black!
Cheers James....If it comes off the car, I keep thinking, it has to be as good or better than new when it goes back.
1985, FB, RX7. Building the dream car.