
Good luck with your engine. I love your detail work, James.
You will have the " Jägermeister" option.
http://www.rh-modell.de/kfz---folierung ... eister.php
James' Race car build

-
rustyrescue
- Posts: 131
- Joined: Tue Feb 02, 2021 7:59 pm
- Been thanked: 7 times
-
gt_james
- VIP User

- Posts: 1068
- Joined: Sun Apr 06, 2014 4:10 pm
- Location: Tewkesbury UK
- Has thanked: 76 times
- Been thanked: 145 times
Re: James' Race car build
I made a bit of a school boy error.
Engine wouldn't turn over in the car, so I took it out. After I'd gotten it out I had run out of time to do any more work on it, which is how I left the last post.
Next time I went I realised the engine wasn't seized at all, it turned over freely. Whilst it was out I used a boroscope thing with my phone and inspected inside the chambers, no damage or FOD. All good.
What had happened was that I'd used a bolt which was just too long to hold the slave cylinder to the bell housing this was locking the flywheel and fooled me into thinking the engine was seized. Oh well, small set back in terms of pulling the engine out, but whilst it was out I did change the gearbox tail housing for a spare one, as the one I had, 1 of the 3 bolts holding the shifter in was broken off.

Before re installing the engine, I checked the end float on the crank, as I'd over torqued the front pulley nut. Sure enough, it was too tight, so I unded the pulley nut, and re torqued it to spec, then the end float was back within it's tolerance again.

Engine is back in now, and I'm back on to wiring. I'm about 70% done with wiring, the wipers have proved a bit challenging to keep the park function.

The dash is in, and the instruments all work. I am re using the original column stalks for light and wiper controls, so have been going through taking pictures whilst testing the pins on the back, to check which pin corresponds to which function.

I have ordered some yazaki connectors, I only have 1 useable connector.
I have filled the engine oil and turned it over on the starter, the oil pressure gauge, low oil level and low oil pressure warning lights all work, and the engine turns over fine and has plenty of oil pressure on the starter.
Once the wiring is finished, it's onto the exhaust, and should be starting it up soon.
Engine wouldn't turn over in the car, so I took it out. After I'd gotten it out I had run out of time to do any more work on it, which is how I left the last post.
Next time I went I realised the engine wasn't seized at all, it turned over freely. Whilst it was out I used a boroscope thing with my phone and inspected inside the chambers, no damage or FOD. All good.
What had happened was that I'd used a bolt which was just too long to hold the slave cylinder to the bell housing
Before re installing the engine, I checked the end float on the crank, as I'd over torqued the front pulley nut. Sure enough, it was too tight, so I unded the pulley nut, and re torqued it to spec, then the end float was back within it's tolerance again.
Engine is back in now, and I'm back on to wiring. I'm about 70% done with wiring, the wipers have proved a bit challenging to keep the park function.
The dash is in, and the instruments all work. I am re using the original column stalks for light and wiper controls, so have been going through taking pictures whilst testing the pins on the back, to check which pin corresponds to which function.
I have ordered some yazaki connectors, I only have 1 useable connector.
I have filled the engine oil and turned it over on the starter, the oil pressure gauge, low oil level and low oil pressure warning lights all work, and the engine turns over fine and has plenty of oil pressure on the starter.
Once the wiring is finished, it's onto the exhaust, and should be starting it up soon.
-
Casey
- Admin

- Posts: 1347
- Joined: Sat May 07, 2011 5:46 pm
- Location: Colchester, UK
- Has thanked: 443 times
- Been thanked: 324 times
Re: James' Race car build
Good progress James, after a heart-stopping setback which must have been both a relief and annoying when you realised what had happened. An easy mistake to make when you can't see what's happening on the other side of the bellhousing. Especially so if, like me, you like to change as many original bolts as possible for s/steel, and may not have the exact same length bolt on the shelf.
KIMI 1 : 1st Gen, "hybrid" 1983 silver S2 running gear in a 1985 S3 shell, SORN'd, long term resto project
KIMI 2 : 1st Gen, 1983 silver S2 - now sold to Ian Mothersole on here.
KIMI 3 : 1st Gen, 1983 red S3
Plus a 2004 Full Bridgeported RX-8
KIMI 2 : 1st Gen, 1983 silver S2 - now sold to Ian Mothersole on here.
KIMI 3 : 1st Gen, 1983 red S3
Plus a 2004 Full Bridgeported RX-8
-
gt_james
- VIP User
- Posts: 1068
- Joined: Sun Apr 06, 2014 4:10 pm
- Location: Tewkesbury UK
- Has thanked: 76 times
- Been thanked: 145 times
Re: James' Race car build
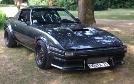
OK time for a decent update.
finished up the epic that was re wiring from scratch. Big learning curve doing all this for the first time but glad I've done it now. Good place to start doing a race car with pretty minimal wiring.

Put the seats and harnesses in


some universal seals for the side windows


You can kinda see I got the heated windscreen fitted, and also bonded the trims on.
not a great picture of what I actually did but after fitting the winscreen I had the wiper motor and mech in and out to get the arms to park at the bottom. Also if anyone needs any, I bought a bunch of wiper blades that come with the little pins, I don't need them all so could sell them on if of use to anyone.

With the wiring done, the windscreen, wipers, seats and harnesses all done, the big hurdle left was the exhaust. I taught myself as I went, cutting and tig welding mandrel bends to snake the long primary exhaust under the floor pan, merge then over the axle to an 8" silencer. I will convert this to repackable when its emptied, and I am currently fitting an additional silencer.


Somewhere around this point I decided I was determined to get the car finished for Caffeine and machine's built not bought weekend, so I went at it for some long late nights finishing the exhaust and some other bits, and I didn't take so many pictures. It got pretty tight, getting the exhaust done, getting wheels put together and tyres mounted, wheels fitted on the car and a spanner check. It got done and I drove straight to caffeine and machine after a very short test run.
Cheers to Jesse for the help and also my dad and mate Tom.


Was great to run it and drive it for the first time. It's a cool experience driving it, and was nice to get it to a show.


A few more pics of it once I got it home.


Sorting a few jobs that I didn't get time to do before I took it to the show now, and a few niggles from the first drive. Once done, its time to check it on the dyno and book some track time
finished up the epic that was re wiring from scratch. Big learning curve doing all this for the first time but glad I've done it now. Good place to start doing a race car with pretty minimal wiring.
Put the seats and harnesses in
some universal seals for the side windows
You can kinda see I got the heated windscreen fitted, and also bonded the trims on.
not a great picture of what I actually did but after fitting the winscreen I had the wiper motor and mech in and out to get the arms to park at the bottom. Also if anyone needs any, I bought a bunch of wiper blades that come with the little pins, I don't need them all so could sell them on if of use to anyone.
With the wiring done, the windscreen, wipers, seats and harnesses all done, the big hurdle left was the exhaust. I taught myself as I went, cutting and tig welding mandrel bends to snake the long primary exhaust under the floor pan, merge then over the axle to an 8" silencer. I will convert this to repackable when its emptied, and I am currently fitting an additional silencer.
Somewhere around this point I decided I was determined to get the car finished for Caffeine and machine's built not bought weekend, so I went at it for some long late nights finishing the exhaust and some other bits, and I didn't take so many pictures. It got pretty tight, getting the exhaust done, getting wheels put together and tyres mounted, wheels fitted on the car and a spanner check. It got done and I drove straight to caffeine and machine after a very short test run.
Cheers to Jesse for the help and also my dad and mate Tom.
Was great to run it and drive it for the first time. It's a cool experience driving it, and was nice to get it to a show.
A few more pics of it once I got it home.
Sorting a few jobs that I didn't get time to do before I took it to the show now, and a few niggles from the first drive. Once done, its time to check it on the dyno and book some track time
-
Threesevens
- VIP User
- Posts: 740
- Joined: Thu Jan 01, 2015 6:07 pm
- Location: Sawbridgeworth Essex England
- Has thanked: 22 times
- Been thanked: 88 times
-
Porters2
- Posts: 202
- Joined: Mon Aug 02, 2021 7:00 pm
- Has thanked: 85 times
- Been thanked: 124 times
- Contact:
Re: James' Race car build

Looks superb, nice job James.
1983 Stardust blue Elford. Being recommissioned after 20+ years off the road.
-
Casey
- Admin
- Posts: 1347
- Joined: Sat May 07, 2011 5:46 pm
- Location: Colchester, UK
- Has thanked: 443 times
- Been thanked: 324 times
Re: James' Race car build
Great work James, looks awesome KIMI 1 : 1st Gen, "hybrid" 1983 silver S2 running gear in a 1985 S3 shell, SORN'd, long term resto project
KIMI 2 : 1st Gen, 1983 silver S2 - now sold to Ian Mothersole on here.
KIMI 3 : 1st Gen, 1983 red S3
Plus a 2004 Full Bridgeported RX-8
KIMI 2 : 1st Gen, 1983 silver S2 - now sold to Ian Mothersole on here.
KIMI 3 : 1st Gen, 1983 red S3
Plus a 2004 Full Bridgeported RX-8
-
gt_james
- VIP User
- Posts: 1068
- Joined: Sun Apr 06, 2014 4:10 pm
- Location: Tewkesbury UK
- Has thanked: 76 times
- Been thanked: 145 times
Re: James' Race car build
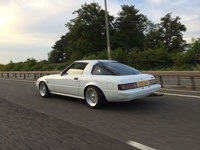
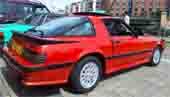
After getting the car on the road I have been trying to get it track ready. I wasn't completely happy with a few things and had a few niggling issues.
The worst issue is the weber IDA needs setting up, so I welded a fitting in the exhaust for my AEM wideband, which has been really helpful tuning the carb. Whilst I was at it I also wrapped the rest of the primaries in header wrap, and I also installed an additional rear silencer tucked under the valence. I did quite a bit of heat shielding around the fuel cell also.


I also had some clearance issues on the rear axle, so I adjusted the panhard bar and changed the wheel spacers on the back, not quite resolved it but mostly better. I also made new adjustable lower control arms, aluminium with chromoly rod ends, and re adjusted the 3rd link arm too when setting it up.


I also redrilled the control arm mounts on the front subframe to reduce camber and help fit the wheels in the arches properly. This should also reduce the bump steer a bit. I also changed the front wheel spacers. After doing the front and rear suspension changes I re set the ride height.


With the exhaust and suspension sorted I ordered a plethora of weber parts and started tuning the carb, doing a fair bit of road testing. I came to the conclusion that I needed to mod my weber IDA. I had the 3rd progression hole mod done already, but its leaning out after pulling through several gears, so I'm getting the float bowl enlarged, and I am fitting a 350 needle valve to keep the carb from emptying the float chamber.


Unfortunately before getting the carb finished the clutch friction disc exploded, which meant I had to cancel my booking for a trackday that I was rushing to get the car sorted for. I had a spare stock exedy clutch, so it's since been replaced, but carb still needs more setting up.


I also 3d printed some brackets to hold my 5 panel rear view mirror better, works much better than the aluminium ones I made first.
After the clutch was working again I took the car to sevens day, and Jesse drove my white S3 too.


Hopefully after I get the carb mods done I can dyno the car and book another trackday, itching to get it on track!
The worst issue is the weber IDA needs setting up, so I welded a fitting in the exhaust for my AEM wideband, which has been really helpful tuning the carb. Whilst I was at it I also wrapped the rest of the primaries in header wrap, and I also installed an additional rear silencer tucked under the valence. I did quite a bit of heat shielding around the fuel cell also.
I also had some clearance issues on the rear axle, so I adjusted the panhard bar and changed the wheel spacers on the back, not quite resolved it but mostly better. I also made new adjustable lower control arms, aluminium with chromoly rod ends, and re adjusted the 3rd link arm too when setting it up.
I also redrilled the control arm mounts on the front subframe to reduce camber and help fit the wheels in the arches properly. This should also reduce the bump steer a bit. I also changed the front wheel spacers. After doing the front and rear suspension changes I re set the ride height.
With the exhaust and suspension sorted I ordered a plethora of weber parts and started tuning the carb, doing a fair bit of road testing. I came to the conclusion that I needed to mod my weber IDA. I had the 3rd progression hole mod done already, but its leaning out after pulling through several gears, so I'm getting the float bowl enlarged, and I am fitting a 350 needle valve to keep the carb from emptying the float chamber.
Unfortunately before getting the carb finished the clutch friction disc exploded, which meant I had to cancel my booking for a trackday that I was rushing to get the car sorted for. I had a spare stock exedy clutch, so it's since been replaced, but carb still needs more setting up.
I also 3d printed some brackets to hold my 5 panel rear view mirror better, works much better than the aluminium ones I made first.
After the clutch was working again I took the car to sevens day, and Jesse drove my white S3 too.
Hopefully after I get the carb mods done I can dyno the car and book another trackday, itching to get it on track!
-
rustyrescue
- Posts: 131
- Joined: Tue Feb 02, 2021 7:59 pm
- Been thanked: 7 times
Re: James' Race car build
looking really fantastic and you will get there with the carb...........Similar fiddling here with a four cylinder old motorbike took and age due to exhaust and intake mods.