
Lucky's Series 3
-
ian65

- Admin

- Posts: 6402
- Joined: Wed Mar 30, 2011 12:11 am
- Has thanked: 232 times
- Been thanked: 276 times
Re: Lucky's Series 3
Epic writeup..... This must be heading towards being the most bespoke fb in the country...talk about reinventing the wheel. Those driving lamps came off an elford that had spent it entire life in a seaside town in Cornwall so no wonder they were rusty, the rest of the car had practically dissolved in the salt air. Your dipstick mod is inspired...nice one 
1999 Jaguar XJR V8 Supercharged
1992 Peugeot 205 1.9 GTI
2003 Mercedes SLK 200 Kompressor
-
Hobbawobba

- VIP User

- Posts: 1949
- Joined: Tue Nov 01, 2011 9:44 pm
- Location: Worcester - UK
- Has thanked: 441 times
- Been thanked: 181 times
Re: Lucky's Series 3
This is when I looked to the scrolley button thing on the right side of my pageLucky wrote:So, time for another one of my "mini" updates
-
myatt1972

- VIP User
- Posts: 1565
- Joined: Thu Mar 31, 2011 10:54 am
- Location: Staffordshire Moorlands
- Has thanked: 29 times
- Been thanked: 24 times
Re: Lucky's Series 3
Great write up Nik as always, some serious engine bay bling there.
Wouldn't want to change a near side rear lamp on your car though.
Wouldn't want to change a near side rear lamp on your car though.
Keith...
-
Lucky
- VIP User
- Posts: 2685
- Joined: Mon Nov 07, 2011 8:30 pm
- Location: Worthing, UK
- Been thanked: 3 times
Re: Lucky's Series 3
lol. That's why there's a big hole through the middle of the support bracket; bit of a fiddle but I can get my hand through to remove the bulbholders. If the light has to come out it's only four bolts to undo the whole lot anyway 
As to the dipstick, I have to confess I stole the idea from Dave. Dunno where he got his from, but I figured how hard can it be to DIY one? Worst that'd happen is I'd end up with a shorter dipstick and a knackered keyring. I did buy a spare dipstick from Mick on Exile, just in case I buggered it up but Parcel Force lost it anyway so I just had to man up
As to the dipstick, I have to confess I stole the idea from Dave. Dunno where he got his from, but I figured how hard can it be to DIY one? Worst that'd happen is I'd end up with a shorter dipstick and a knackered keyring. I did buy a spare dipstick from Mick on Exile, just in case I buggered it up but Parcel Force lost it anyway so I just had to man up
-
Marc S
- VIP User
- Posts: 581
- Joined: Thu Nov 03, 2011 9:23 am
- Location: East Sussex, UK
- Contact:
Re: Lucky's Series 3
More awesome work as always mate, really love what you've done...I get the odd comment at work about "a really nice blue rx7 like yours that's down the road" and I just say "yes, I know, lovely innit" 

-
Lucky
- VIP User
- Posts: 2685
- Joined: Mon Nov 07, 2011 8:30 pm
- Location: Worthing, UK
- Been thanked: 3 times
Re: C147TMX
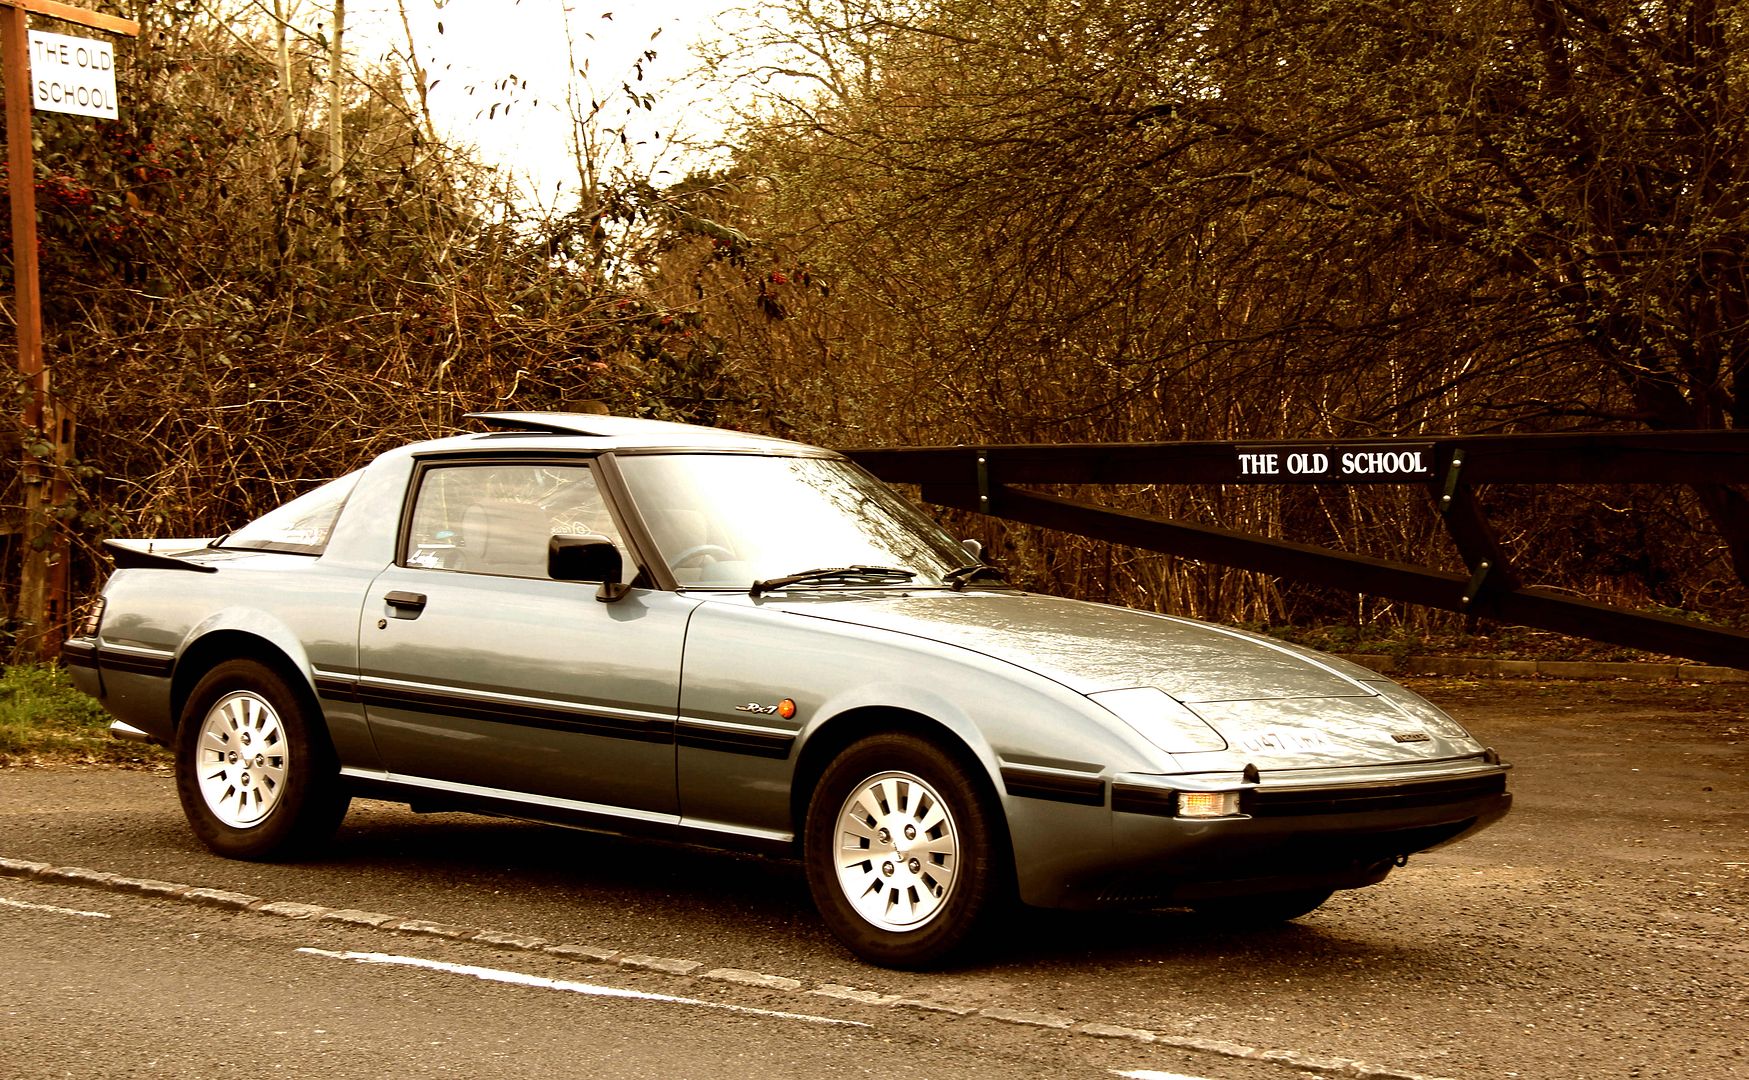
In a stark contrast of before/after kinda stylee, I stopped to take a photo today on the way to Jo's to try and get Ralph the RX-4 started (successfully, I might add  ). Anyhoo, in March three years ago I took this photo en route to represent the FB in the CAR Magazine "Generations of RX-7" photoshoot;
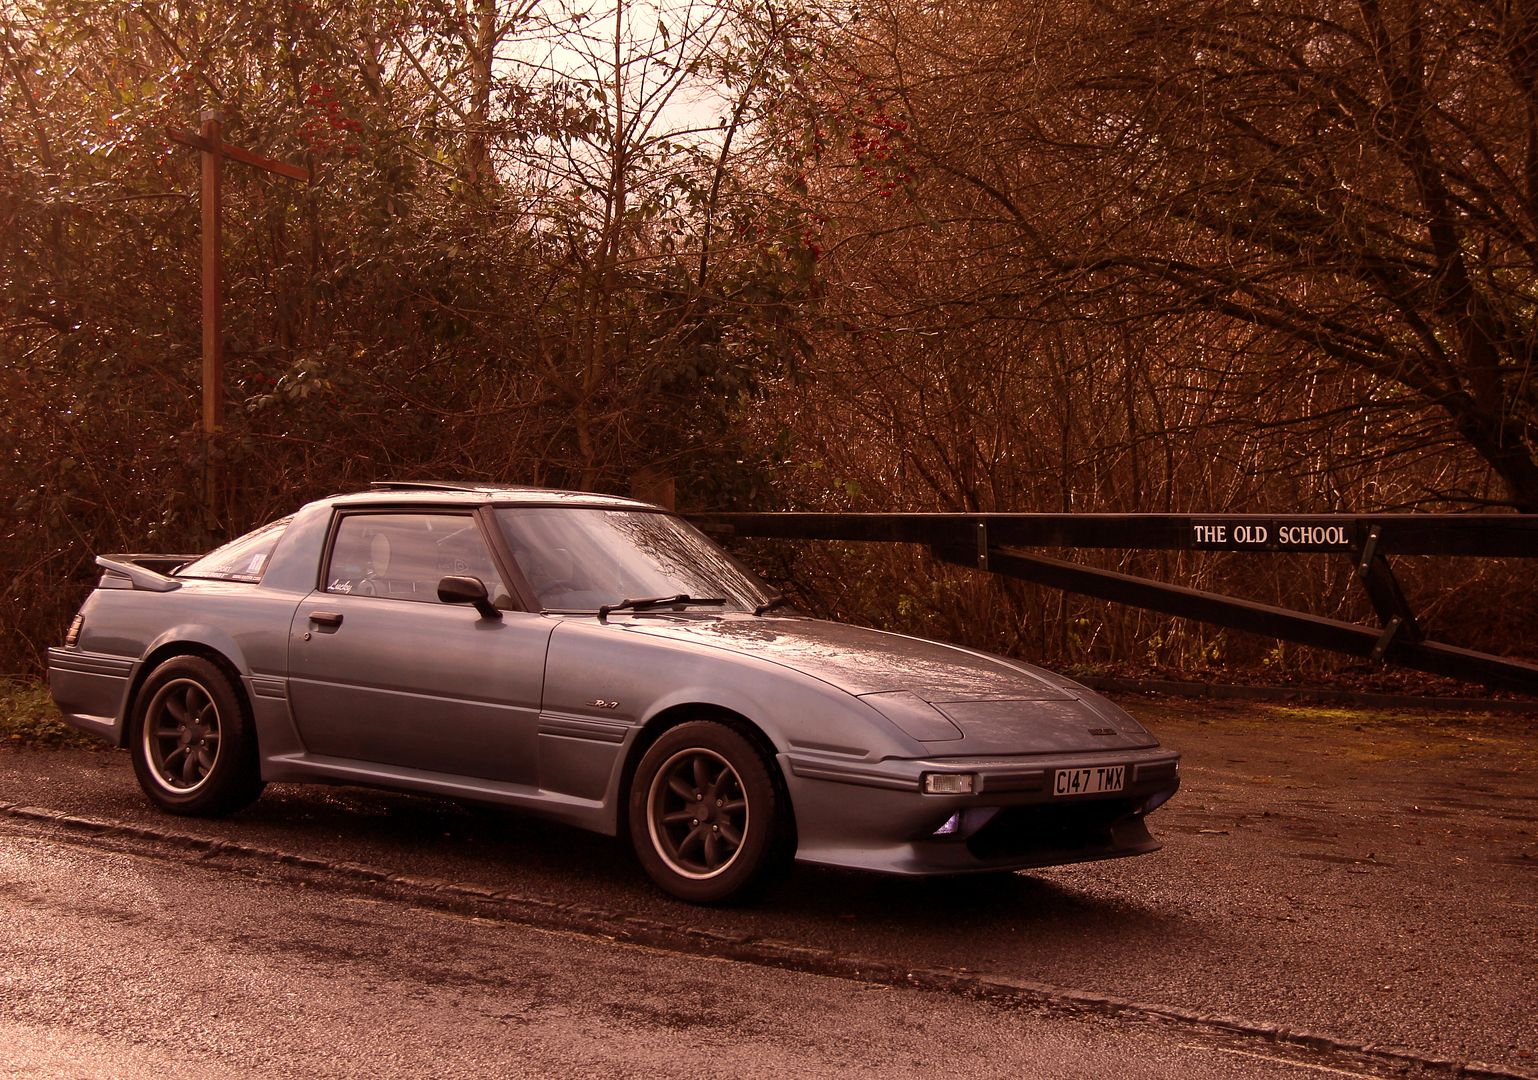
and today, it looked rather like this... what a difference three years makes!
Yep, that's right, well spotted. One of the signs has fallen down

and today, it looked rather like this... what a difference three years makes!

Yep, that's right, well spotted. One of the signs has fallen down
-
spirit r

- VIP User
- Posts: 1896
- Joined: Sat Feb 09, 2013 4:15 pm
- Location: Germany Black Forest
- Has thanked: 365 times
- Been thanked: 165 times
- Contact:

-
ian65
- Admin
- Posts: 6402
- Joined: Wed Mar 30, 2011 12:11 am
- Has thanked: 232 times
- Been thanked: 276 times
Re: C147TMX
Has that been 3 years?
You've certainly put your stamp on the car... it's unrecognisable apart from the reg number.... I bet you don't even want to think about how much you've poured into it
You've certainly put your stamp on the car... it's unrecognisable apart from the reg number.... I bet you don't even want to think about how much you've poured into it
1999 Jaguar XJR V8 Supercharged
1992 Peugeot 205 1.9 GTI
2003 Mercedes SLK 200 Kompressor
-
Lucky
- VIP User
- Posts: 2685
- Joined: Mon Nov 07, 2011 8:30 pm
- Location: Worthing, UK
- Been thanked: 3 times
Re: Lucky's Series 3
So, I arrr been doin stuff. Nothing very exciting (as usual) but that never stopped me before so here we go anyway...
In the seemingly never-ending quest to sort out my windscreen washers, the next thrilling instalment coming up! Despite my nice new shiny tank the actual jets seemed very feeble, which was annoying with a brand new pump as well. They ought to be good for squirting passing cyclists and such, but all I got was a lacklustre blurble up the bottom of the screen. Further investigation revealed the cause of the problem
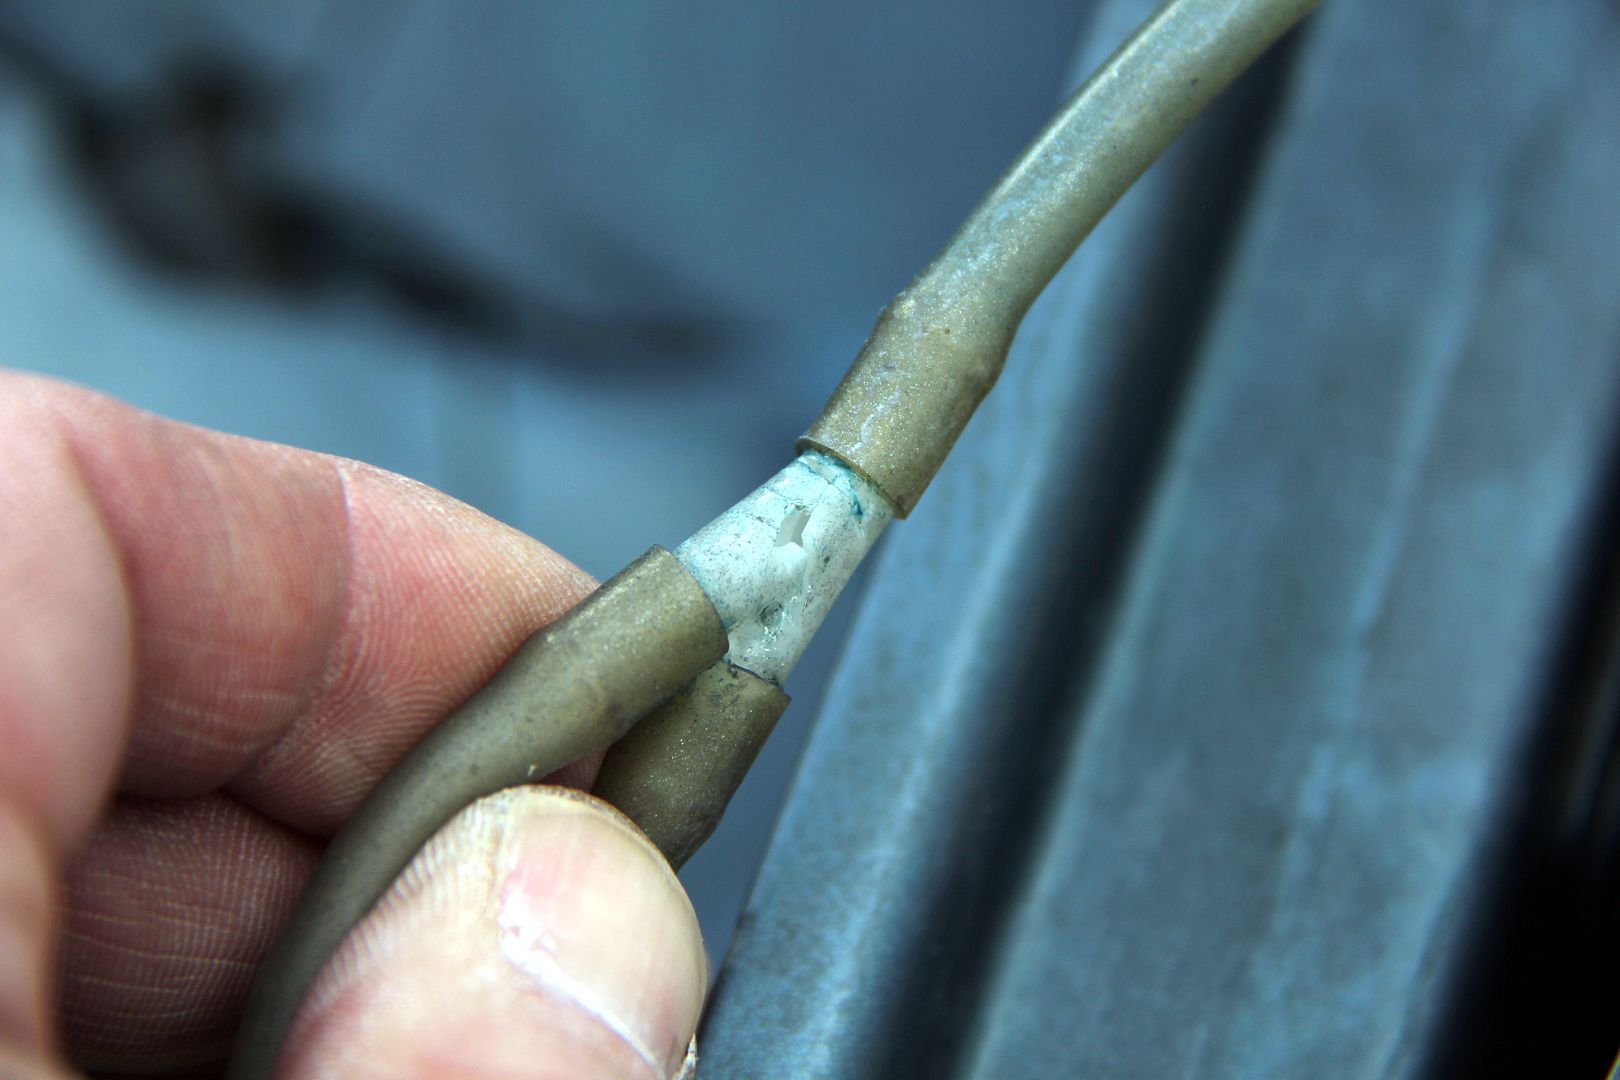
Oh yeah, that'll be the problem then. I hadn't bothered swapping out the jet lines and connectors because I figured "what can go wrong with them" after all. Seems quite a bit. The Y-piece had completely given up the ghost and was mostly filling the scuttle with washer fluid. The lines were hard and brittle and split in a few places. I guess they'd been OK as long as the atrophied and tired thirty-year-old pump was on there but the lusty new one had proved too much for the geriatric components. Which in actual fact might have proved a blessing in disguise since if I hadn't been forced to replace the lines and Y-piece after all I'd possibly never have spotted
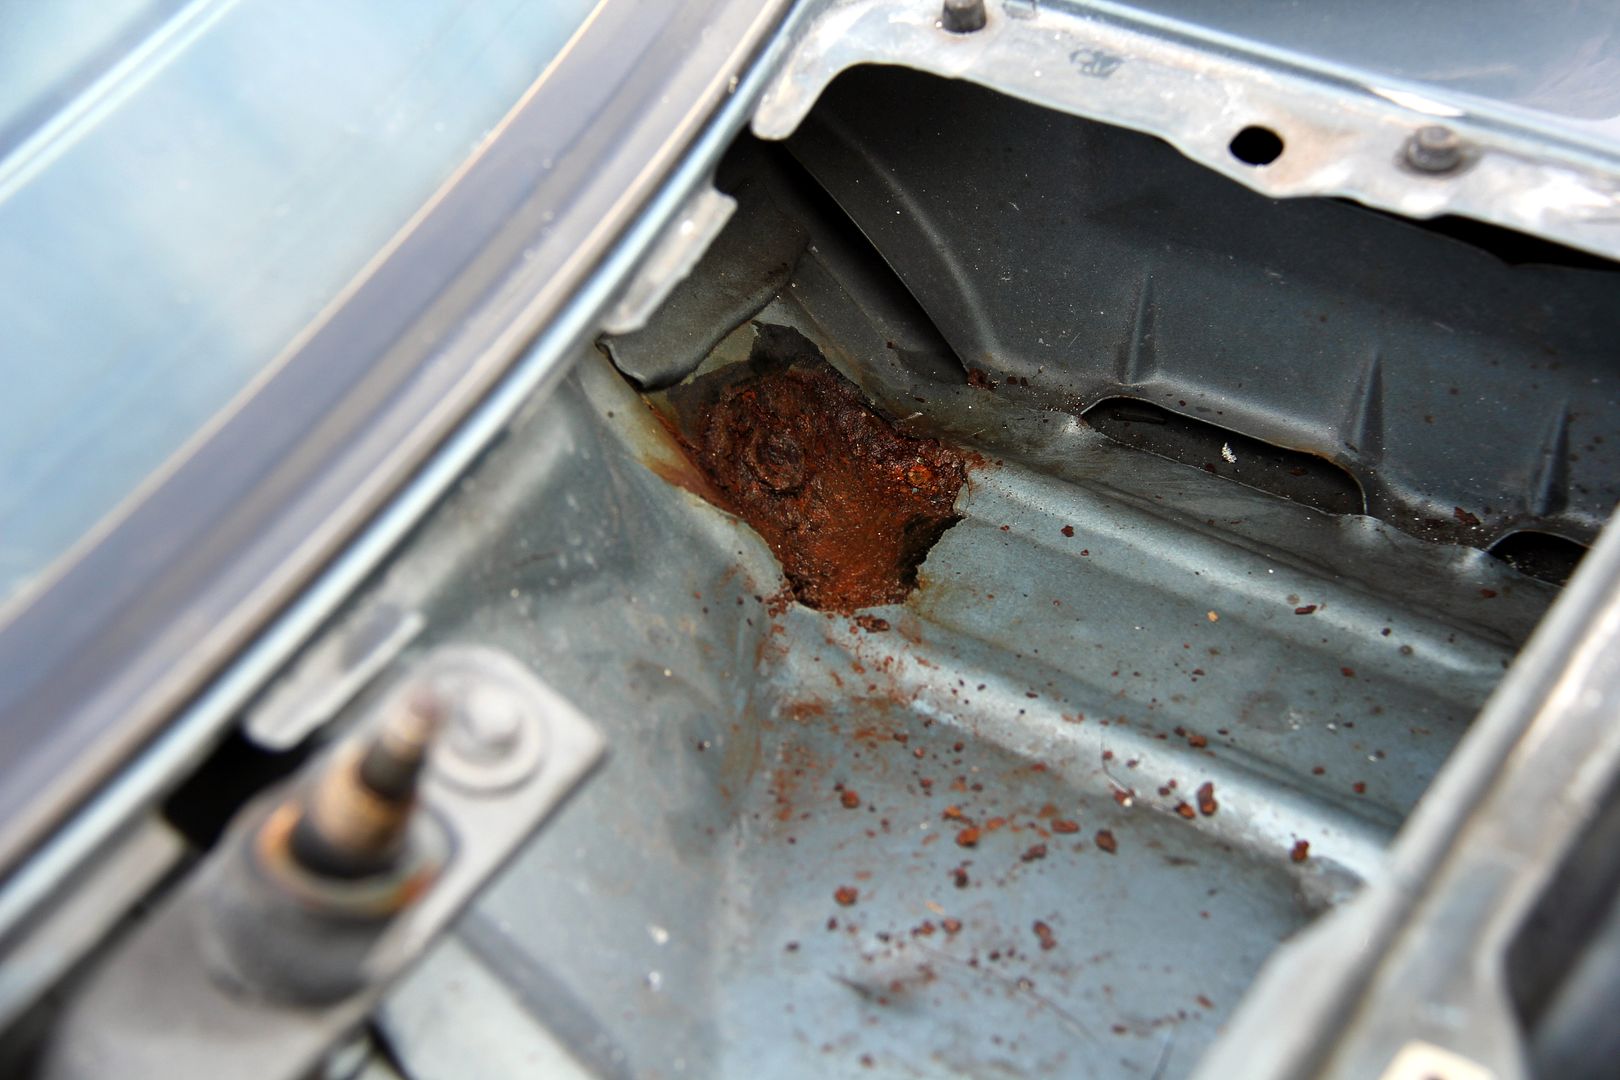
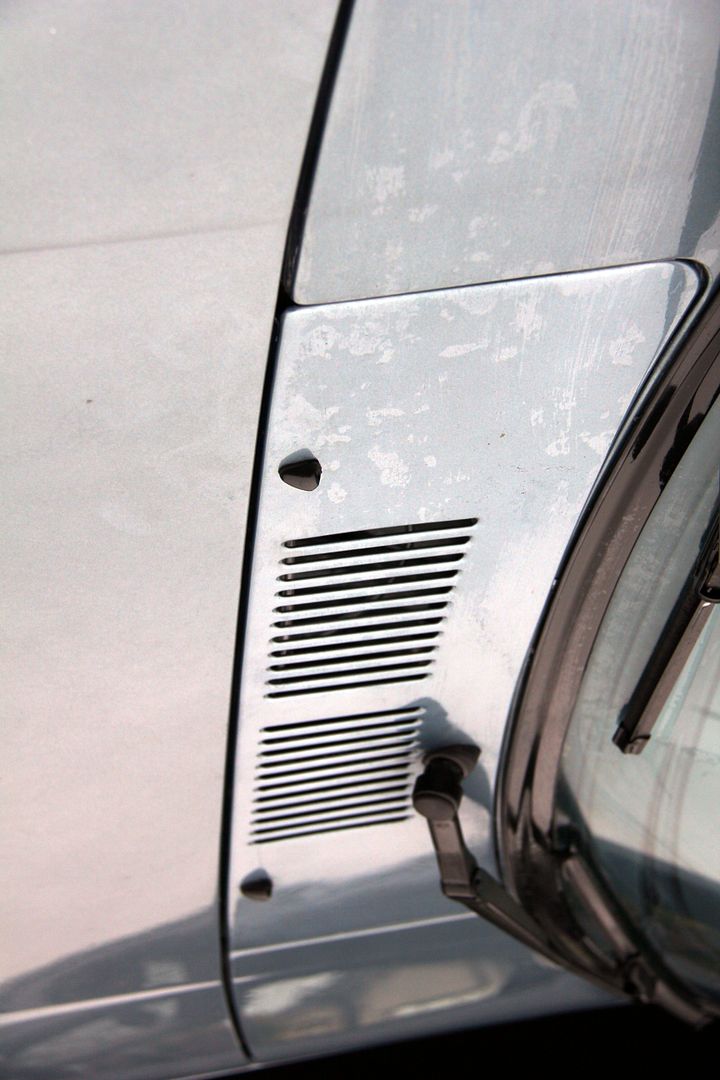
Gahhhhh! At first it looked just like a nasty rust patch, but closer inspection revealed that it was a proper full-blown hole. Mazda stuck a sheet of rubberised anti-boom road noise damping mat to the hollow under the scuttle, and it appears this had cracked up and allowed water to get in under and rust away the steel. Possibly the washer fluid hadn't helped, God knows how long that had been leaking into there. Obviously it needed treating, so I got in as best I could with the wire brushes (access is a total pig, despite what these photos might imply)
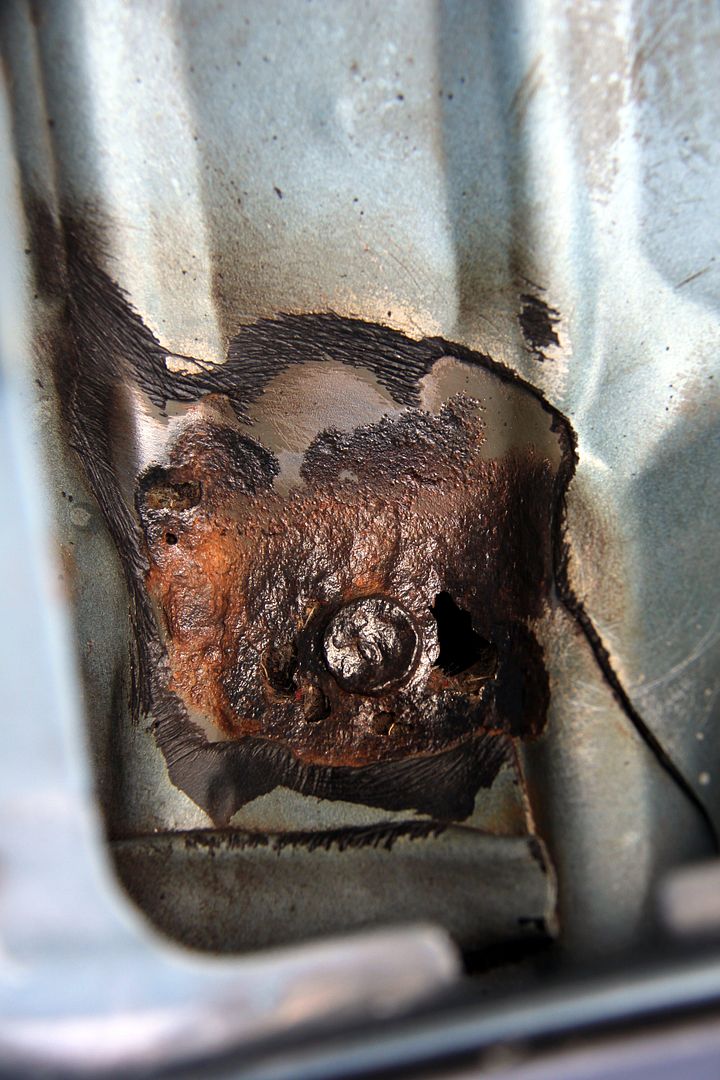
You can see there's a definite hole right through just beside what I assume is one of the captive fixings through to the dashboard. You can see through to the floor and inside of the glovebox. I hope I might be lucky and caught this just as it was starting, I've never noticed any signs of water ingress in the cabin. But then, I've not really been looking. Anyway, loads of rust convertor later
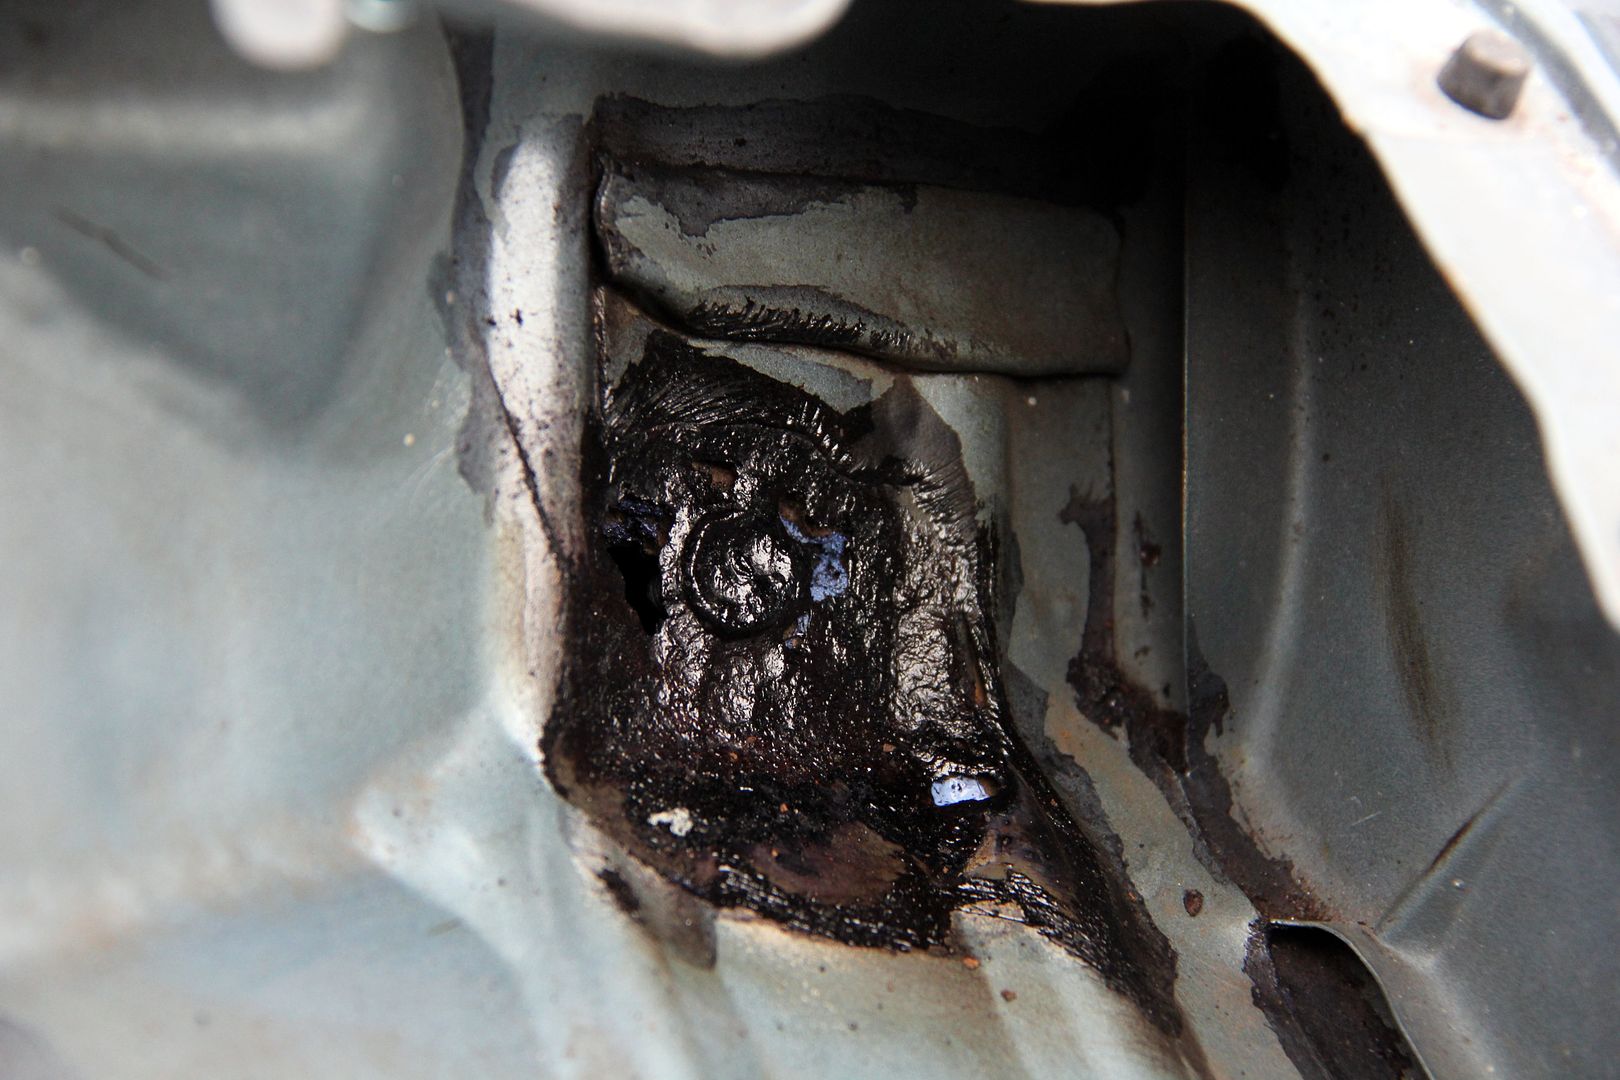
and then a blow-over with some paint to keep it from going again
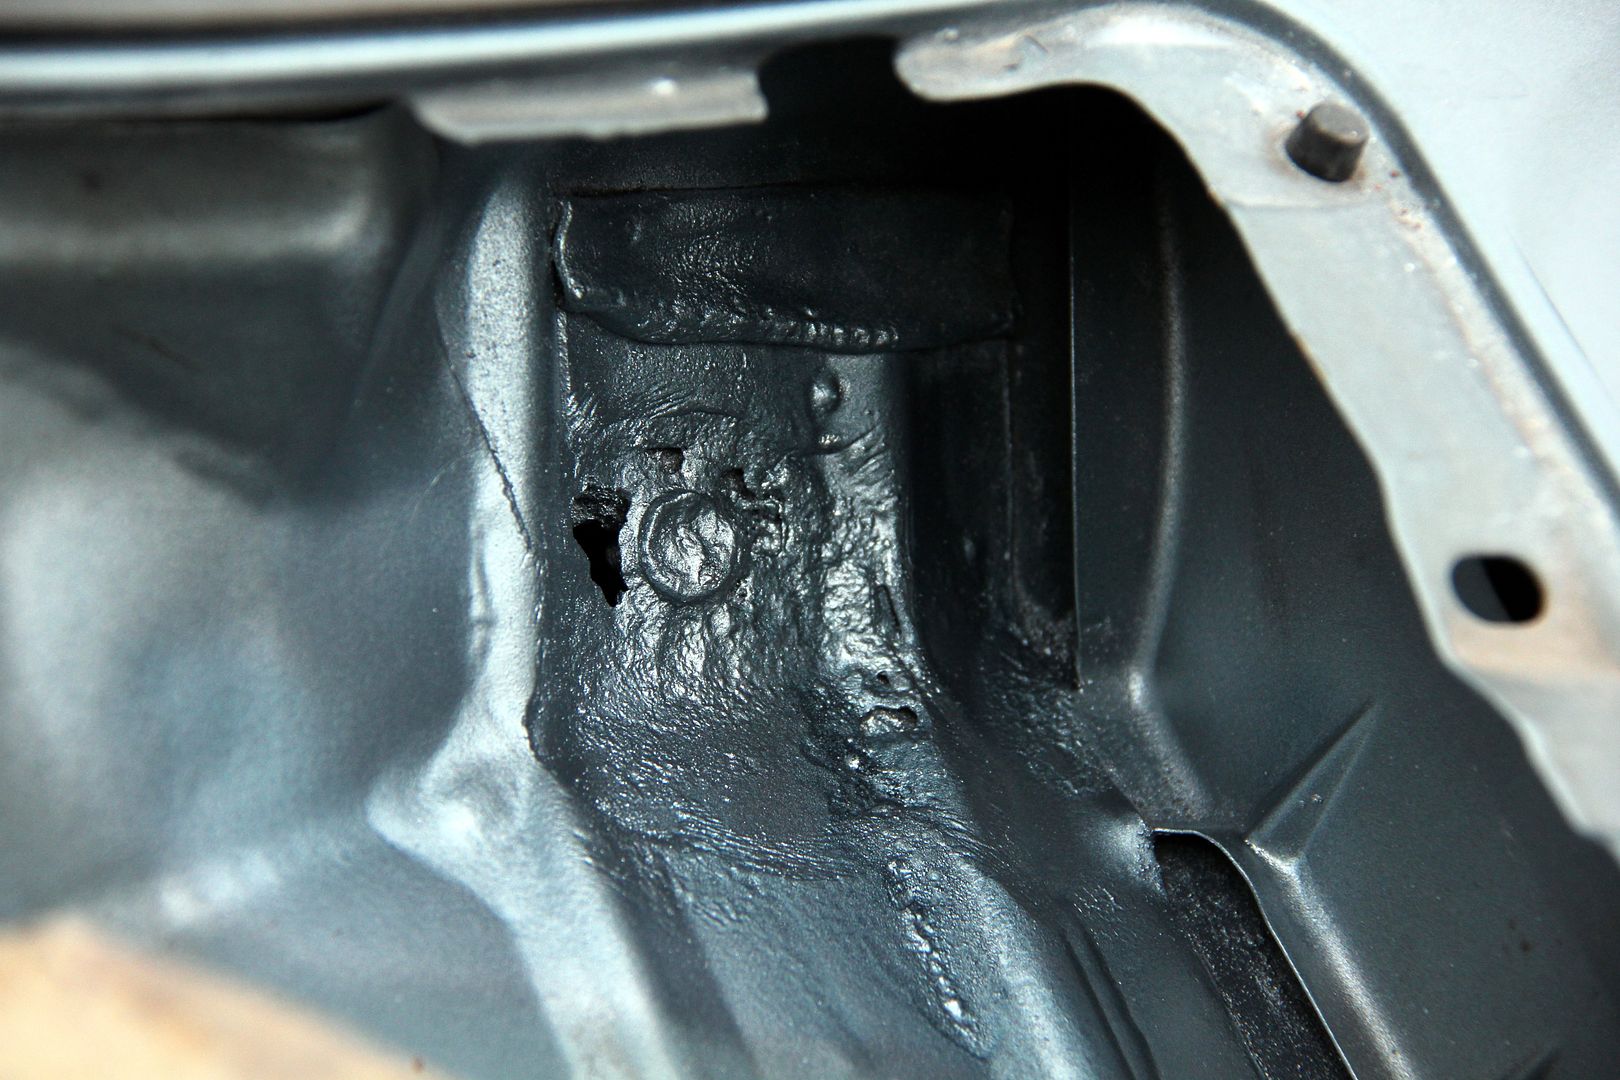
It's not ideal but it'll do for the moment. It'll be a real turdycurse to get in with a welder and replace the steel, so it'll have to wait until the weather (and my finances) improve. For now it's got a polythene sheet sealed down over the top (I know, I know) to stop it getting any worse, hopefully, and that'll have to suffice until I can get it sorted properly.
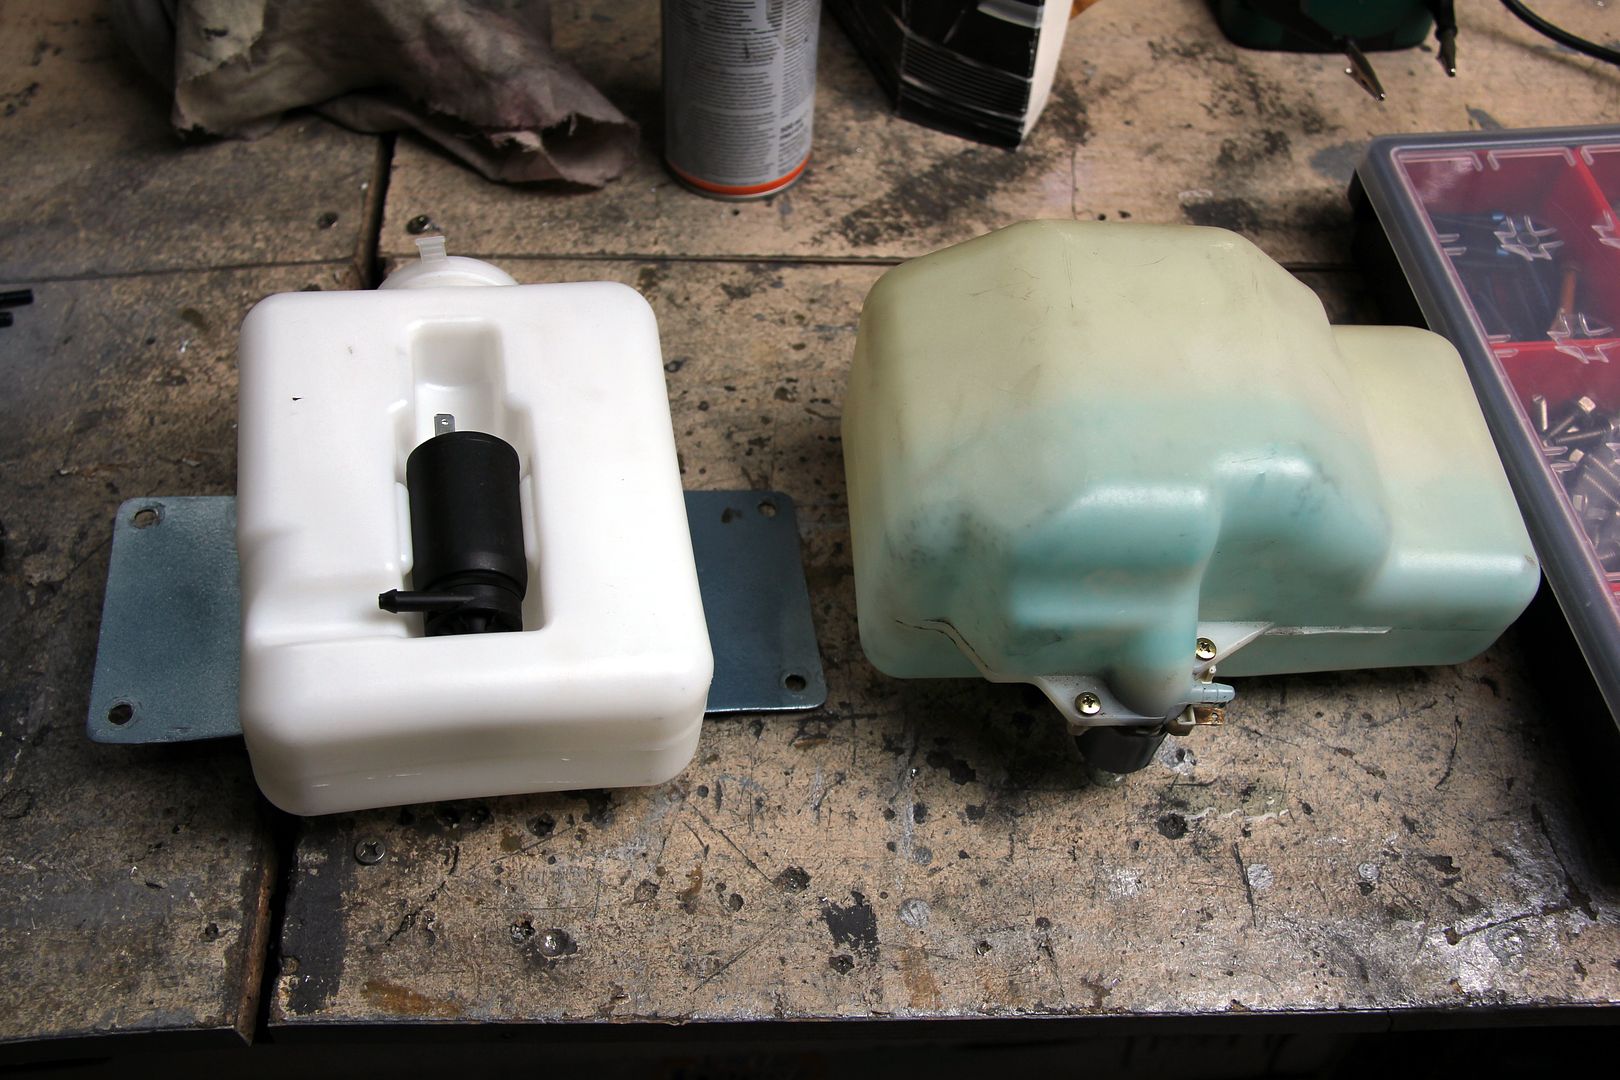
Anyhooo, now I could get on with the original task, which was sorting the bleedin washers out. I just bought a universal washer setup from Car Builder Solutions because this gave me everything I'd need as well as a rather smaller tank to replace the humongous behemoth in the boot, lol. So, all nice new lines and Y-piece to replace the brown and crackly old tat
and I even replaced the funny old round Mazda washer jets with some new aerodynamic ones (lol) since they came in the kit figured I may as well use them
They are now more than squirty enough to douse any passing pedestrians, following motorcyclists, undertaking cyclists, horse riders and all the other road users we assume have less right than us to be there because they get away without road tax or stopping at red lights.
(Note: some of the above may not be 100% accurate....)
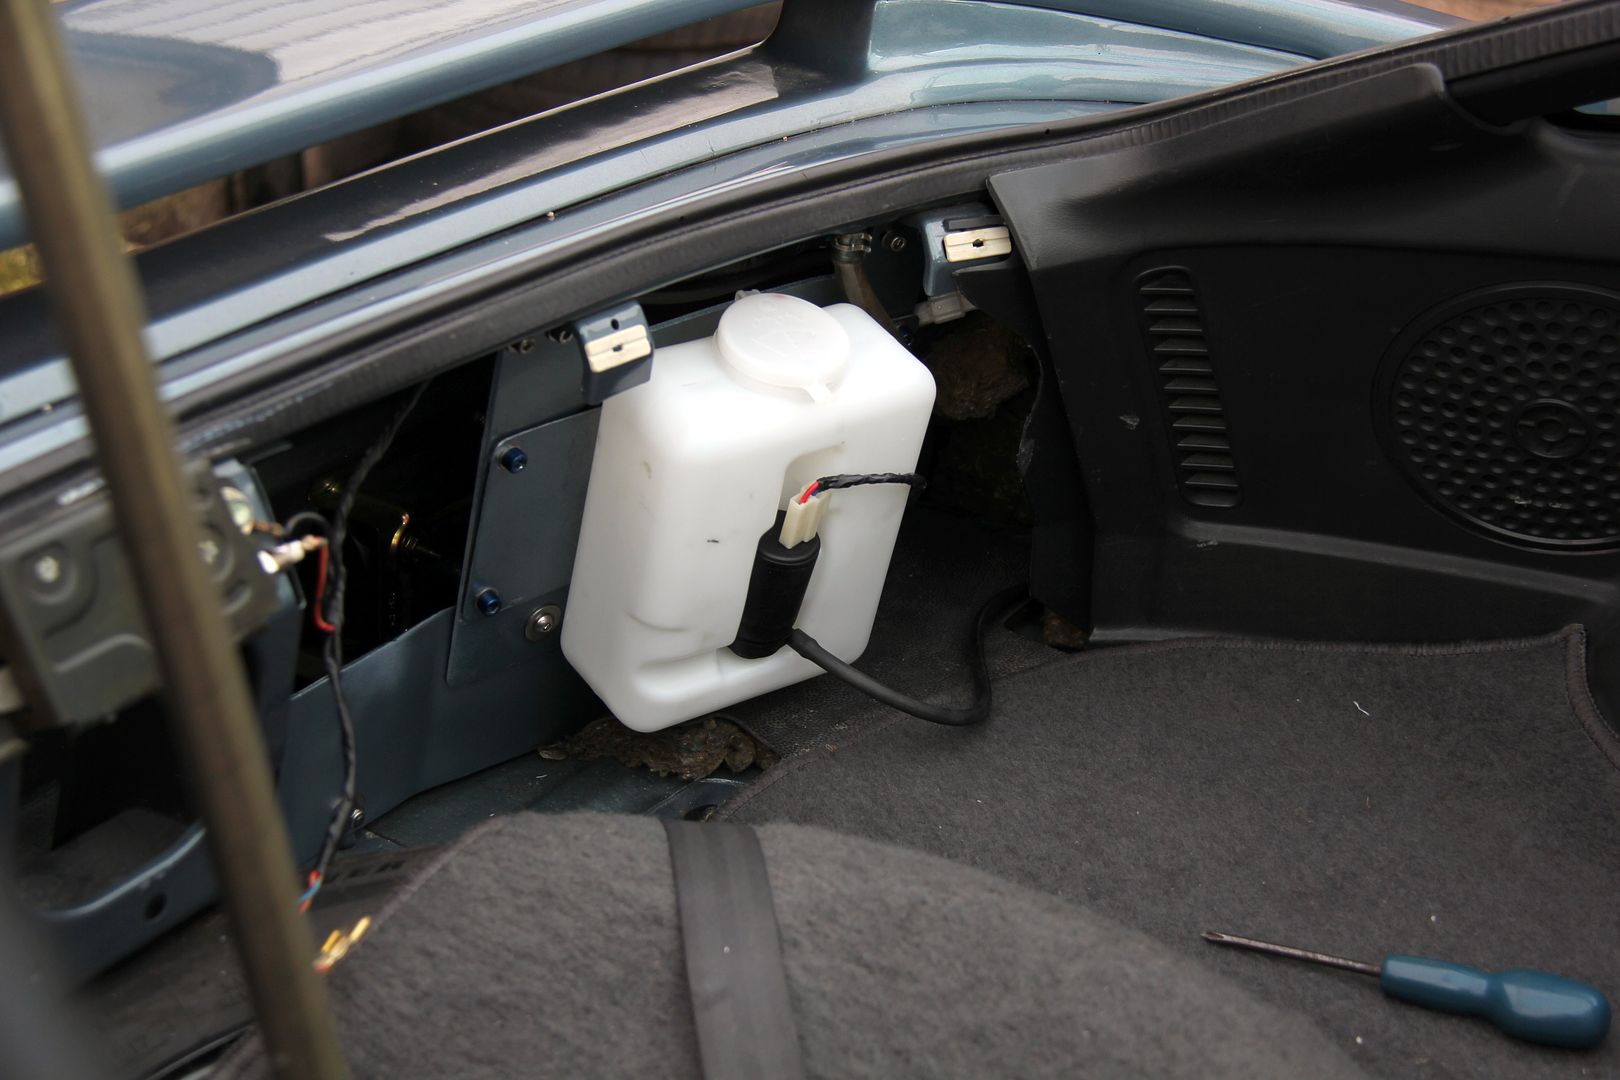
And since I had a nice new kit to utilise, I took the opportunity to swap the aforementioned bulbous rear tank. New one is much more slimline but slightly taller so still holds plenty but doesn't intrude into the boot as much
Only slight irritation was having to extend the wiring to the pump as the original loom was about 3" too short. And as your missus will tell you, sometimes three inches makes all the difference!
So, with the washers FINALLY laid to rest (please, God) I could get one with something a bit more glamorous. Certain elements have already pointed out that the expansion tank in the engine bay is now the only obvious plastic bit left, and that it was only a matter of time. Yep, it's that time!
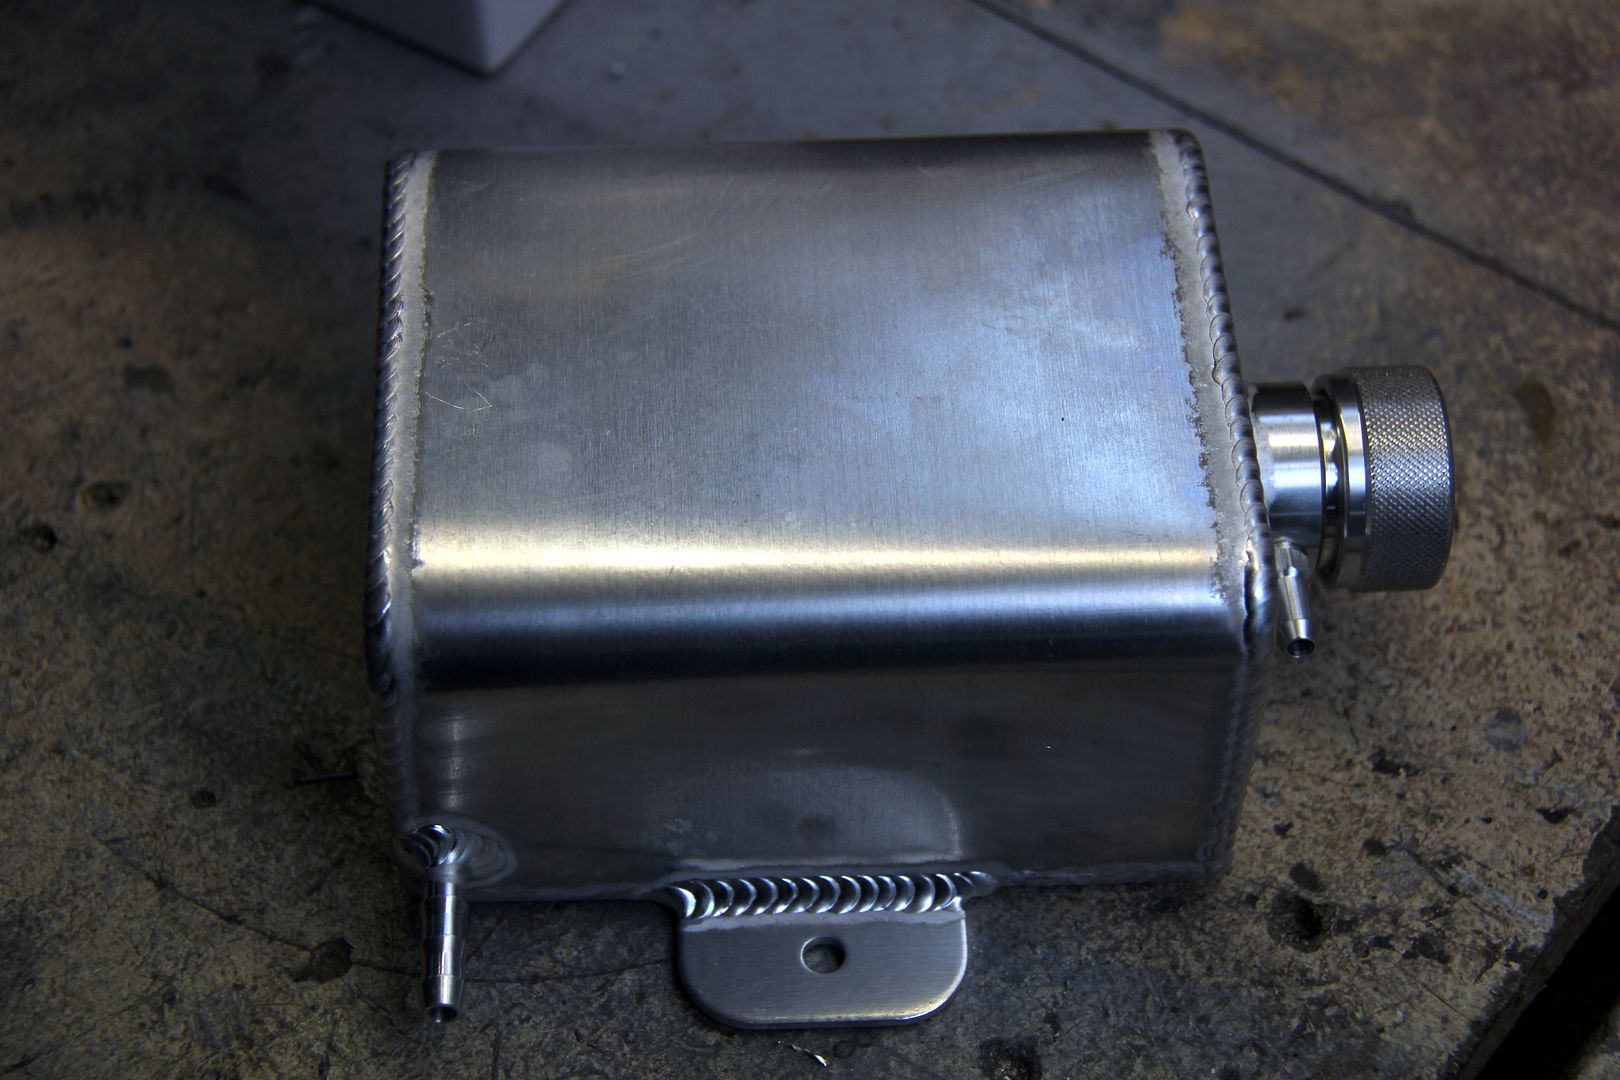
I got this for Chrimble, what at first glance might be the most manly hip flask ever. In fact it's an radiator expansion tank from the same line at the incomparable Car Builder Solutions as the washer tank. It wasn't going to bolt straight on, though. The stock tank has a single tube to it, which goes into the lid and has a dip tube that sits in the coolant an inch or so above the bottom of the tank. This, as certain wise rotary experts have surmised, is because the nature of a rotary engine promotes a lot of sediment in the coolant. The motor is basically a giant Scooby Doo sandwich made from plates of alloy and iron alternated. The dissimilar metals swap ions over time and the result is a kinda rusty gungy solute that precipitates out in various points of the cooling system. One of these is the expansion tank, and Mazda's way of avoiding it getting sucked back into the system is the dip tube that only samples from the coolant rather than the base of the tank where the sediment deposits form. Simple yet clever, like all the best ideas.
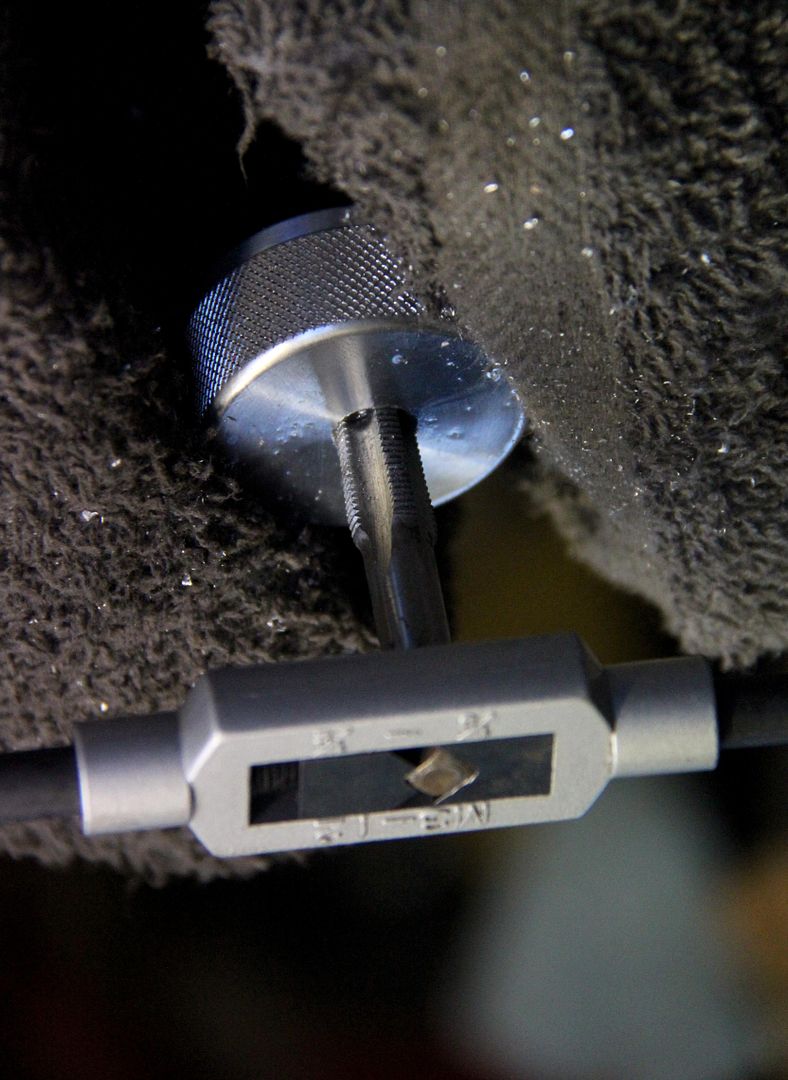
However, my tank had a side-entry union on the neck and one at the very base. Neither of these were going to be any real use in my application. However, rather than just hack them off and render the tank useless in any future different configurations, I decided to blank them instead.
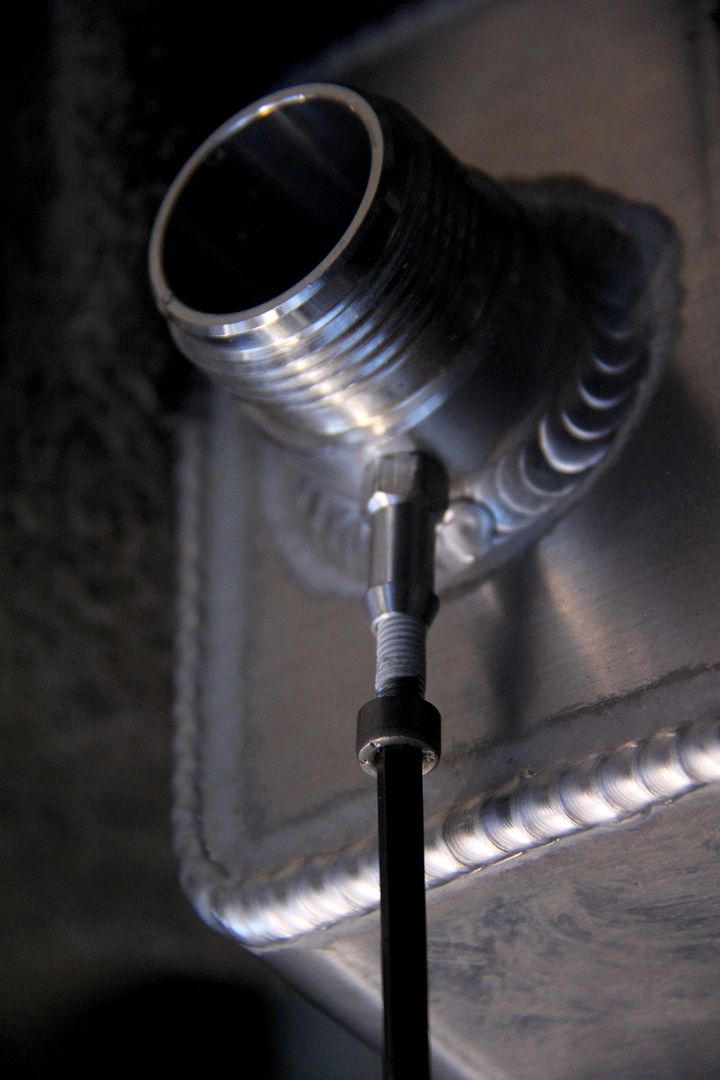
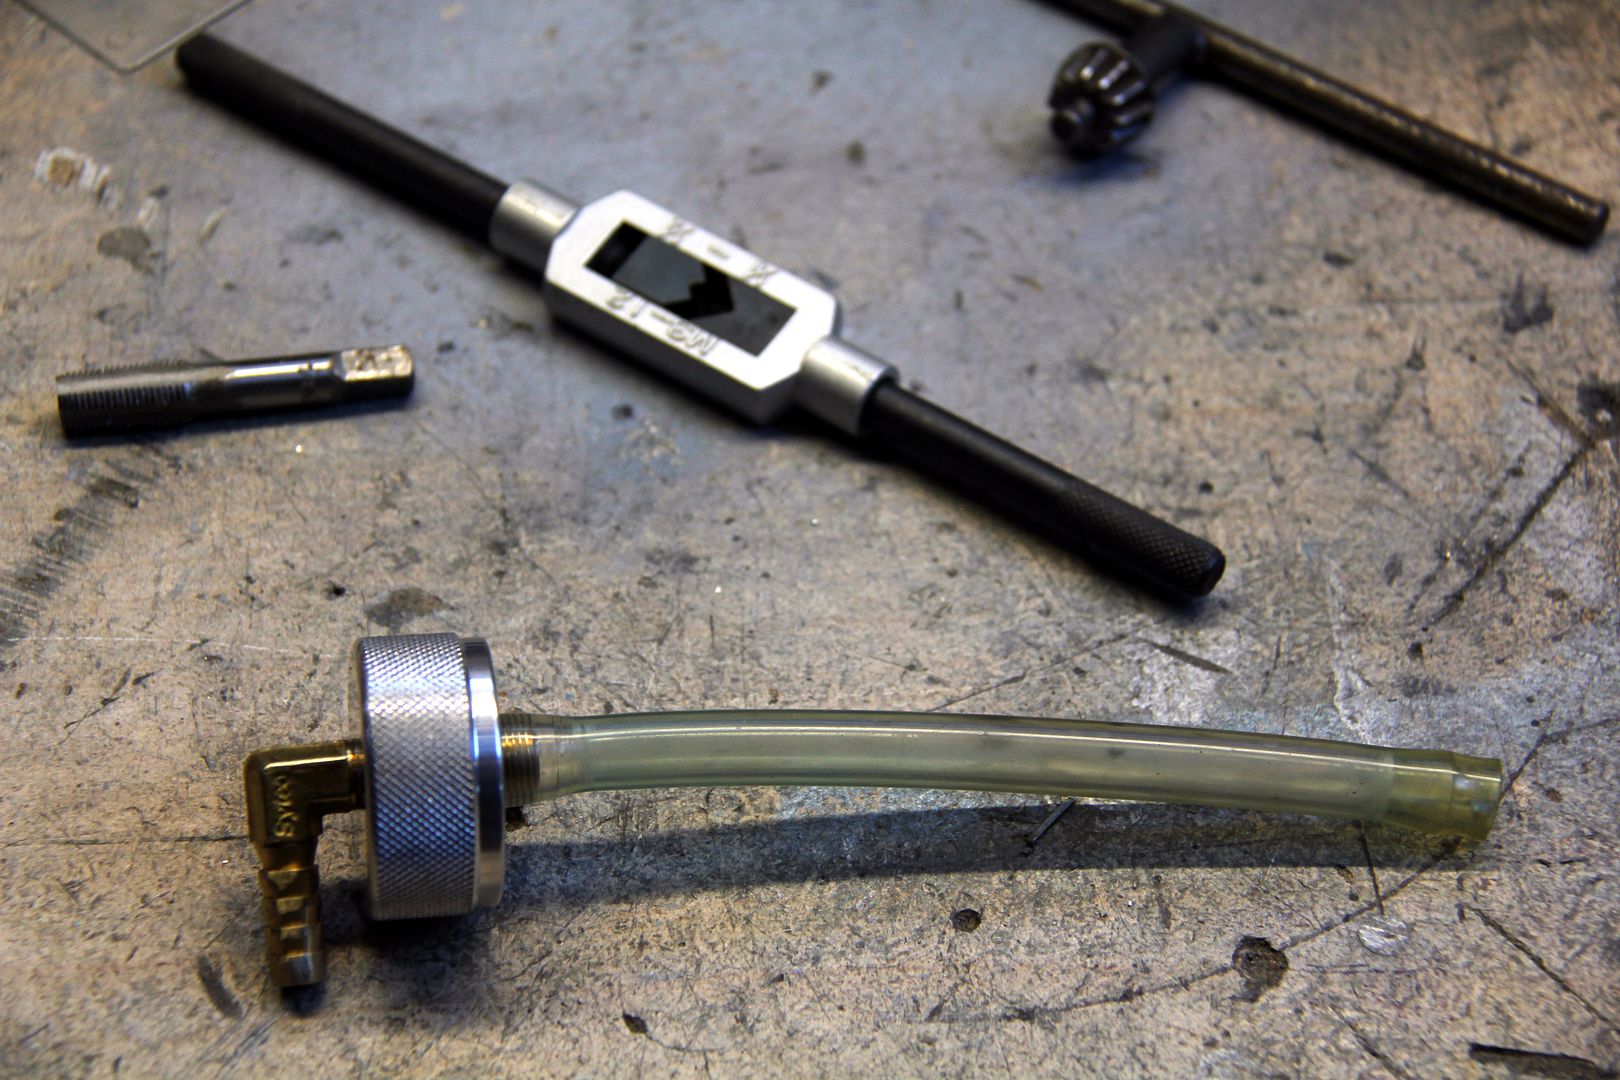
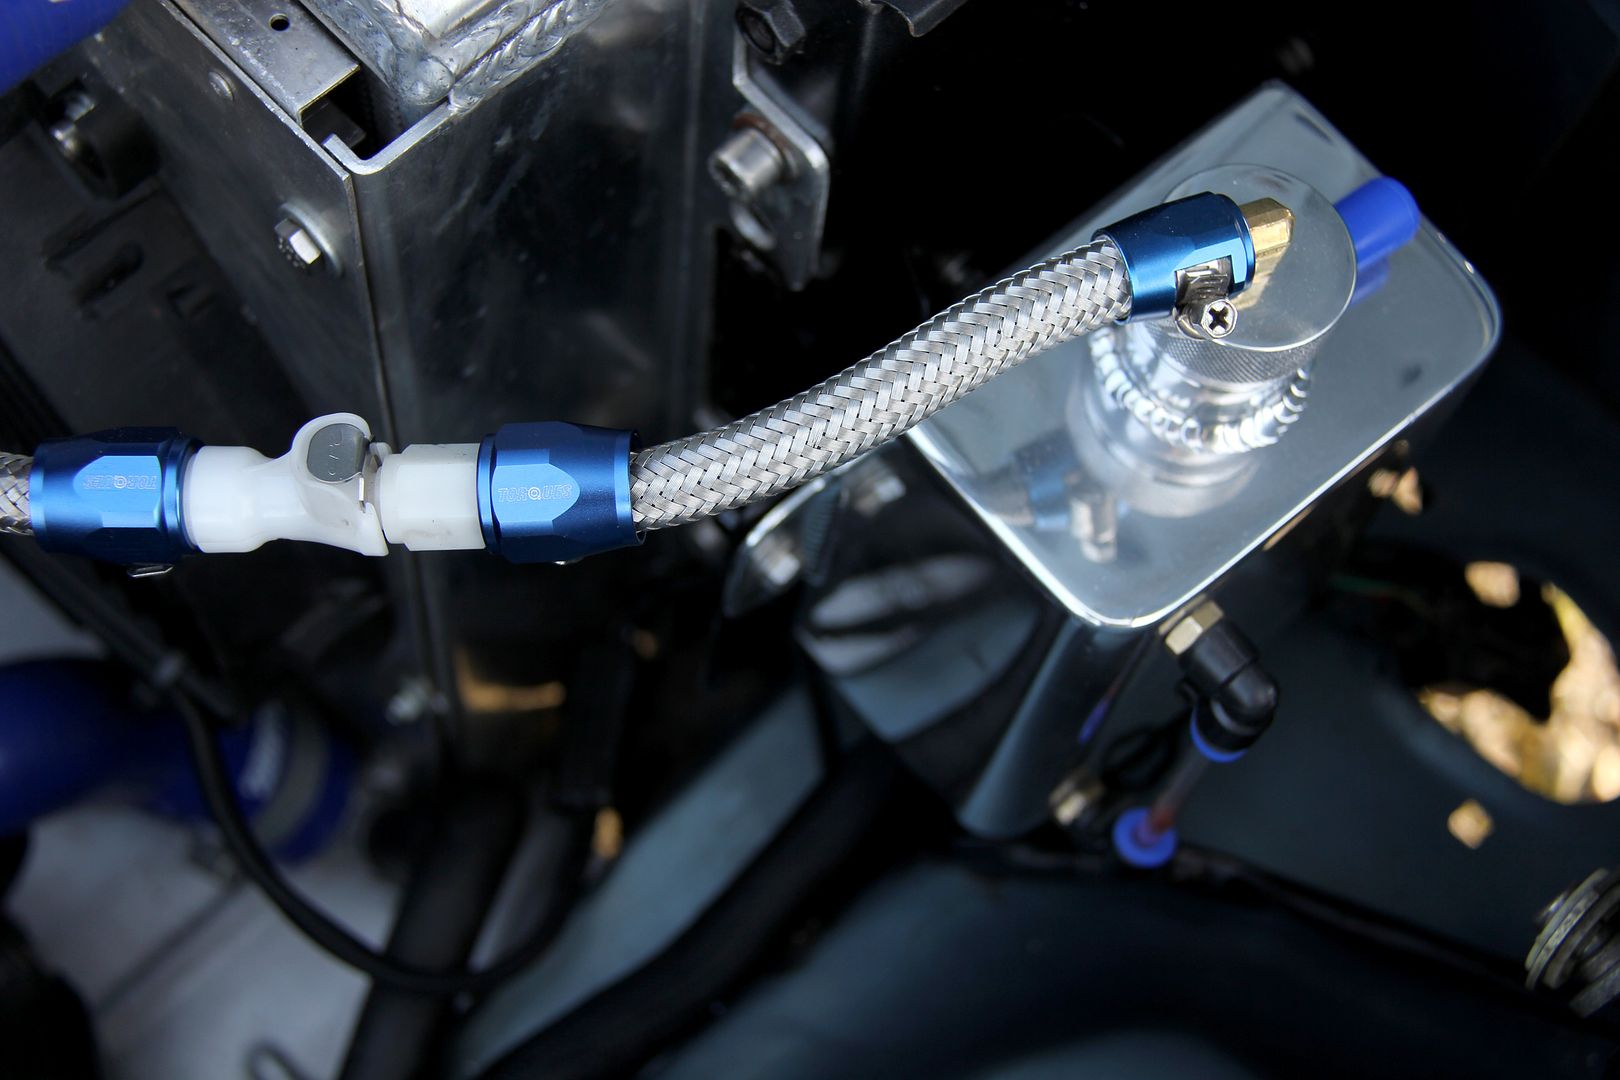
This was the simple matter of tapping a thread to accept an M5 bolt, plenty of PTFE tape and then for belt-and-braces, a silicone cap to go over the top. Job jobbed. However, this meant I still needed a union for the coolant line from the pressure neck on the radiator;
It's at this point that I became an expert on pipe fittings, lol. Took me ages to find a combination that would suit, basically because none of the male to female threads were in quite the right orientation. However, I ended up with a Sytec fuel union and a female reducer for the inside... 1/8th NPT which I would normally avoid because the idea of a tapered thread might well be an American idea of a joke (or world domination, not sure which) but it's a right royal PITA to hand-tap a thread and get it exactly right. Don't get me started on my personal campaign for standardisation across the eight or ten different types of pipe thread in the world, lol. Anyhoo, ended up with this
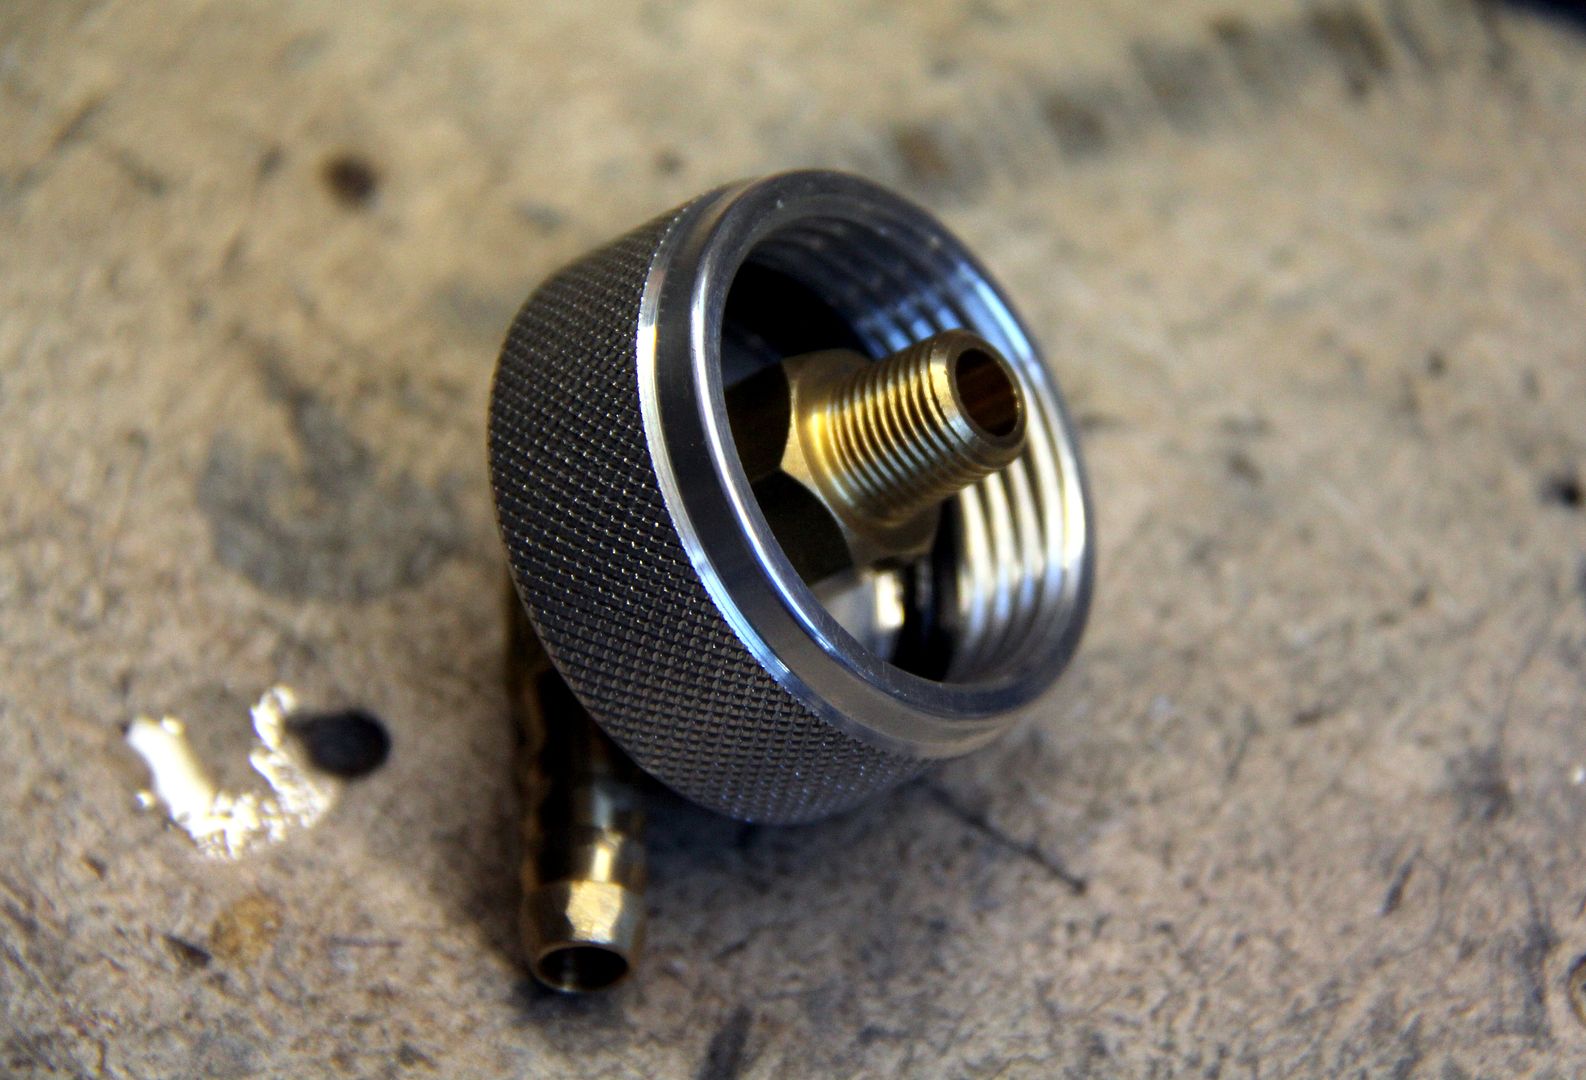
which seemed to work well and remain leak-proof. Hurrah. Then all it needed was a dip tube. This is one hastily made from an old Scottoiler bottle. I love titting around in a Blue Peter stylee, making use of old tat and re-imagining it to do something it was never meant to be
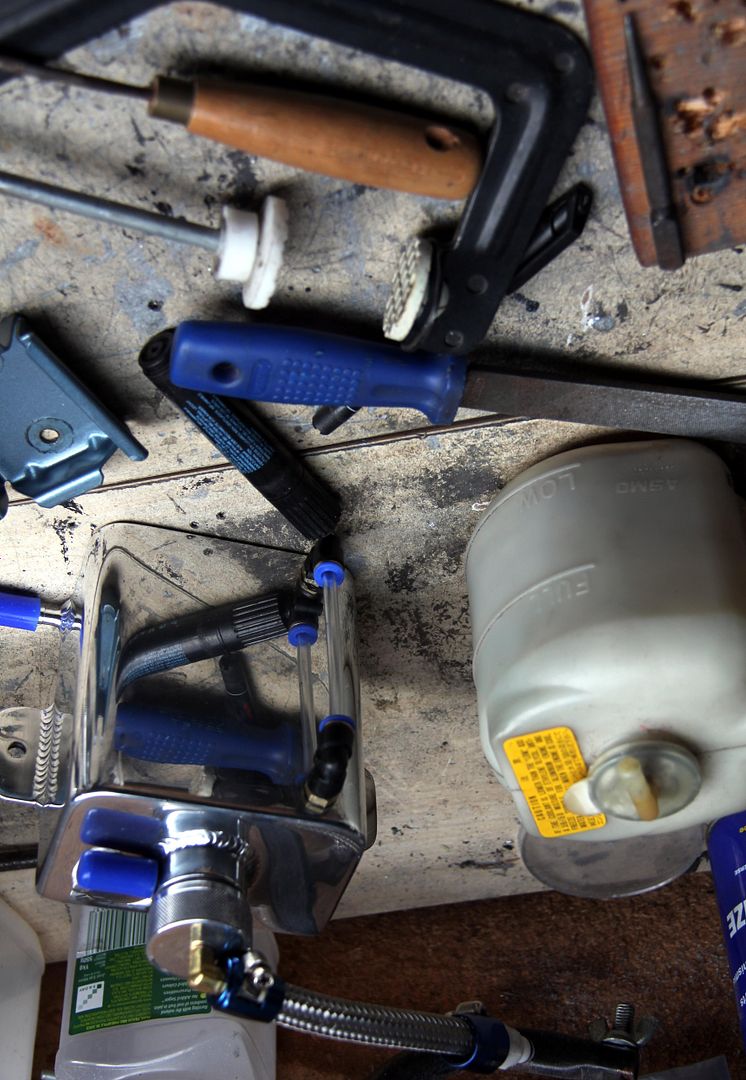
The final physical mod to the tank was to put in a sight glass, because one of the things you need with an expansion tank is to see if it's full, empty or fluctuating. One of these universal jobbies like you get off catch tanks was perfickt for the task
And then it was down to the tedious and laborious task of polishing the tank up to a nice shine. In between doing this, when I simply couldn't face any more sanding for a bit, I got on with making a bracket to hold it. Made out of 6mm ally plate, which is about as thick as I can easily(ish) bend with only my feeble wrists and some molegrips, lol
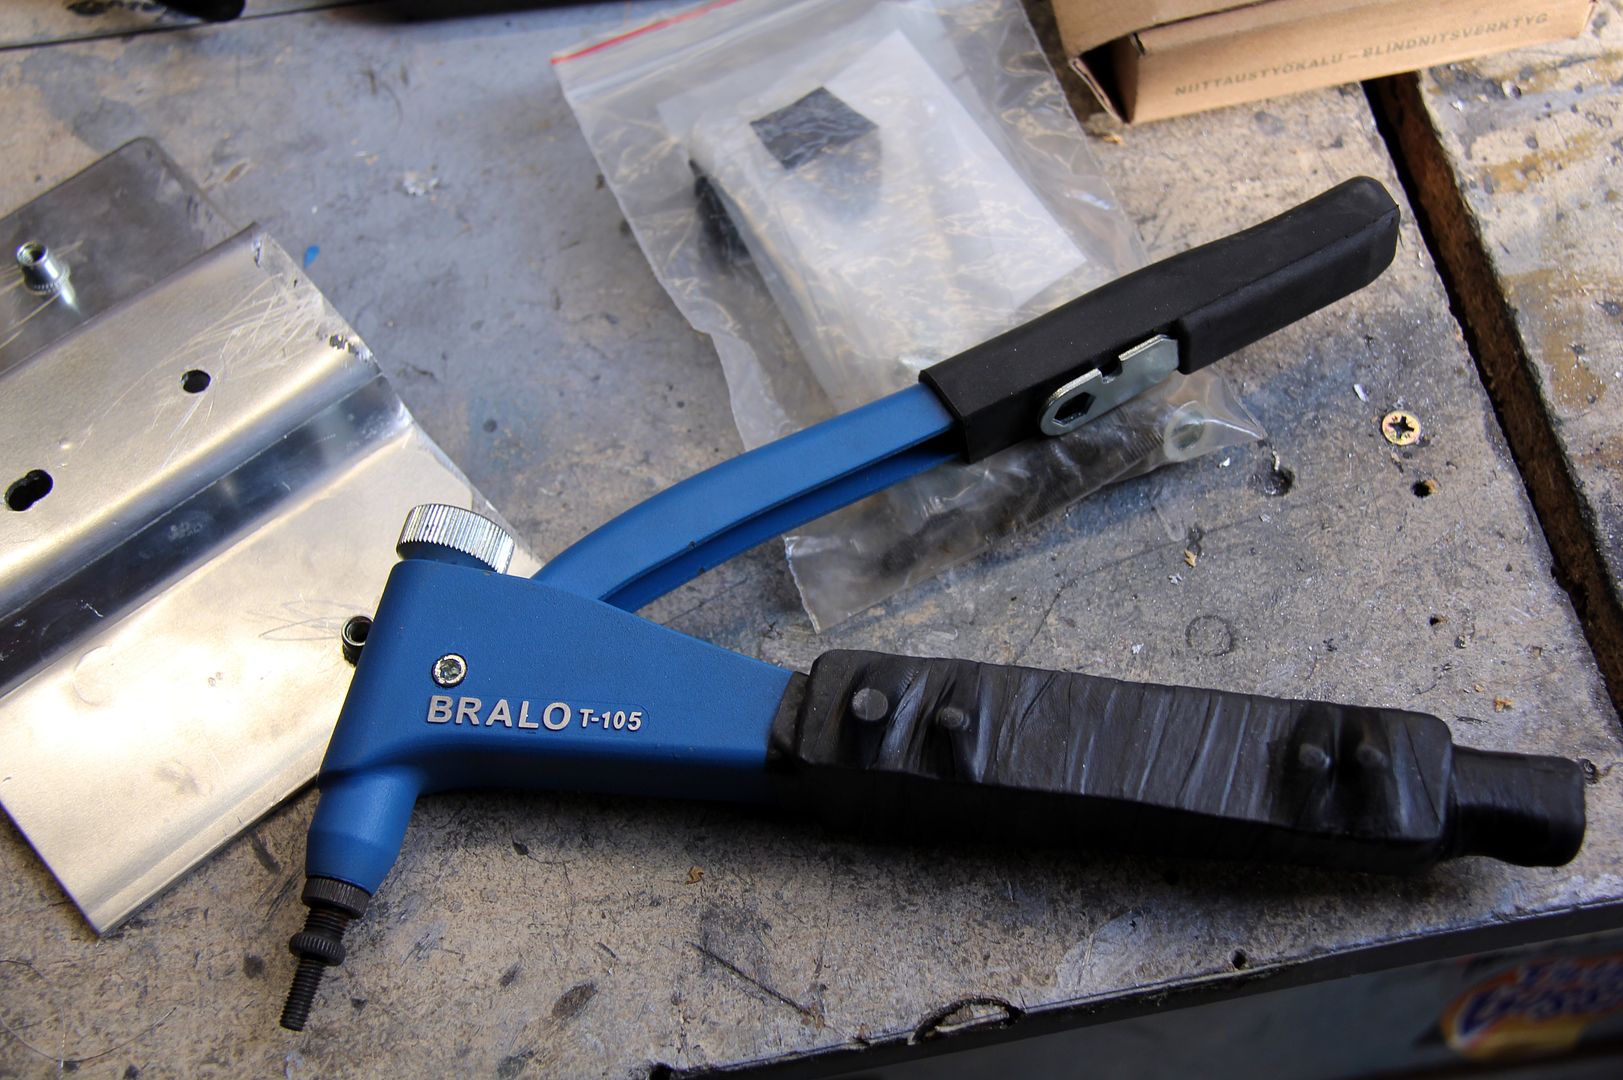
I had to pause to repair my rivnut pulling tool, as an M6 Stainless nutsert had proved too manly for the cast alloy handles and one had sheared off completely. Grrrr! Not the prettiest of repairs admittedly, but some steel plate, bolts and some self-amalgamating tape seem to have done the trick. And it was cheaper than 60-odd quid for a new one
So, here's the final article, all polished up and sat next to the original Mazda one for a bit of contrast. Lovely
And then some satin black on the bracket and it all fitted (pleasingly) as if it was made to go there. Which it kinda was, lol
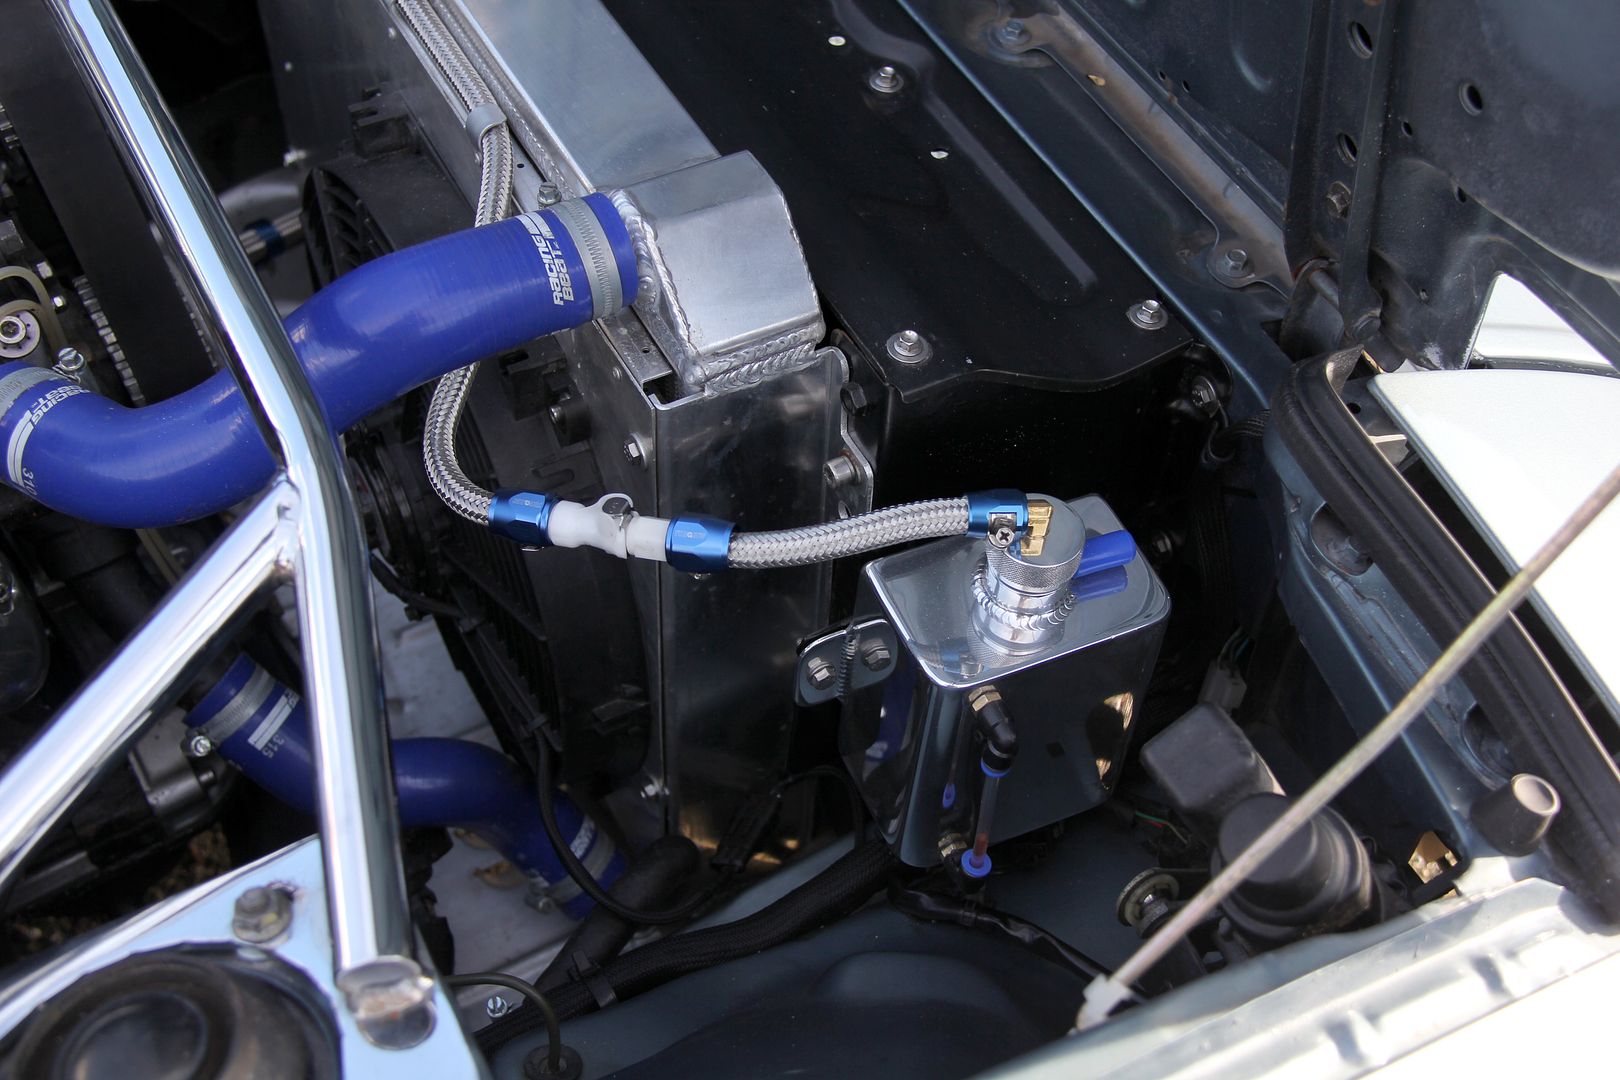
I also included a nifty dry break coupler in-line that I had left over from an old bike. This is a neat little doodad that flows freely in either direction but just press the catch on top and it springs apart, self-sealing both ends without losing a single drop. Makes it much easier to take the cap off without having to get a screwdriver and undo the hose finisher and all that malarkey
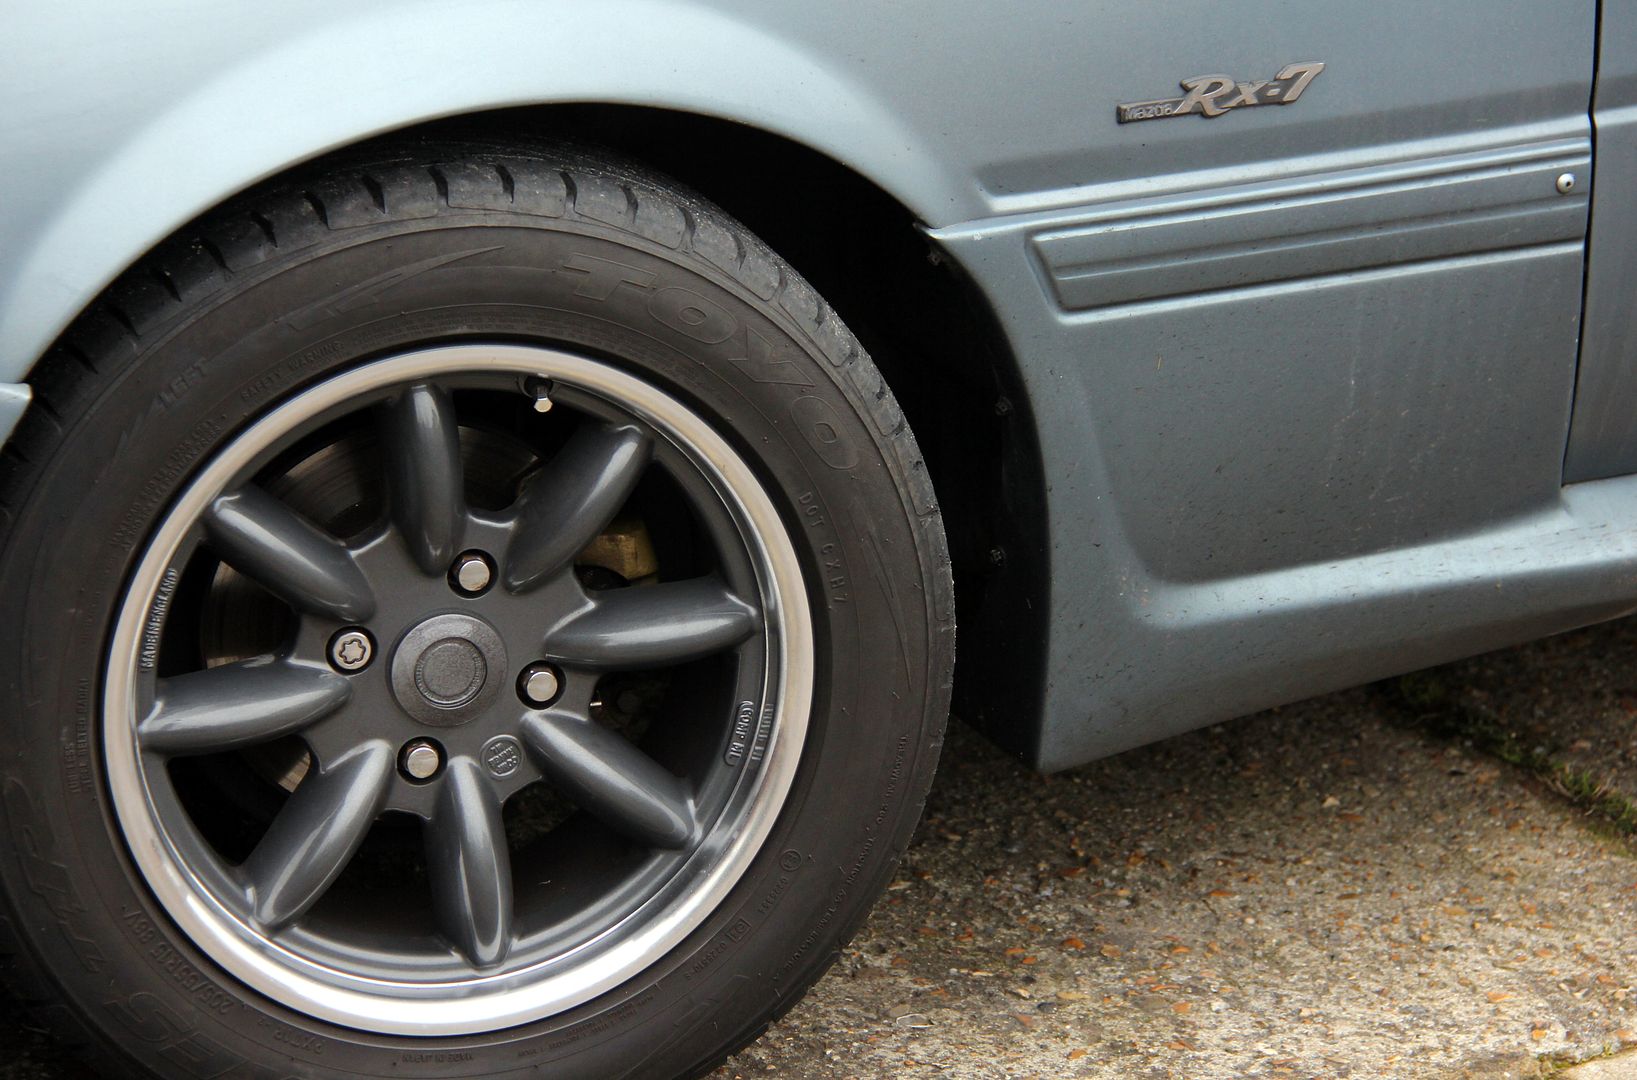
Finally, wheel centre caps. I think I've been through four different versions of these and never quite found The Ones. I never like the stock ones that came with the wheels, they're just too angular-sided, but they were the best of a bad lot. So I was pretty pleased to find these floating by on the muddy waters of eBay
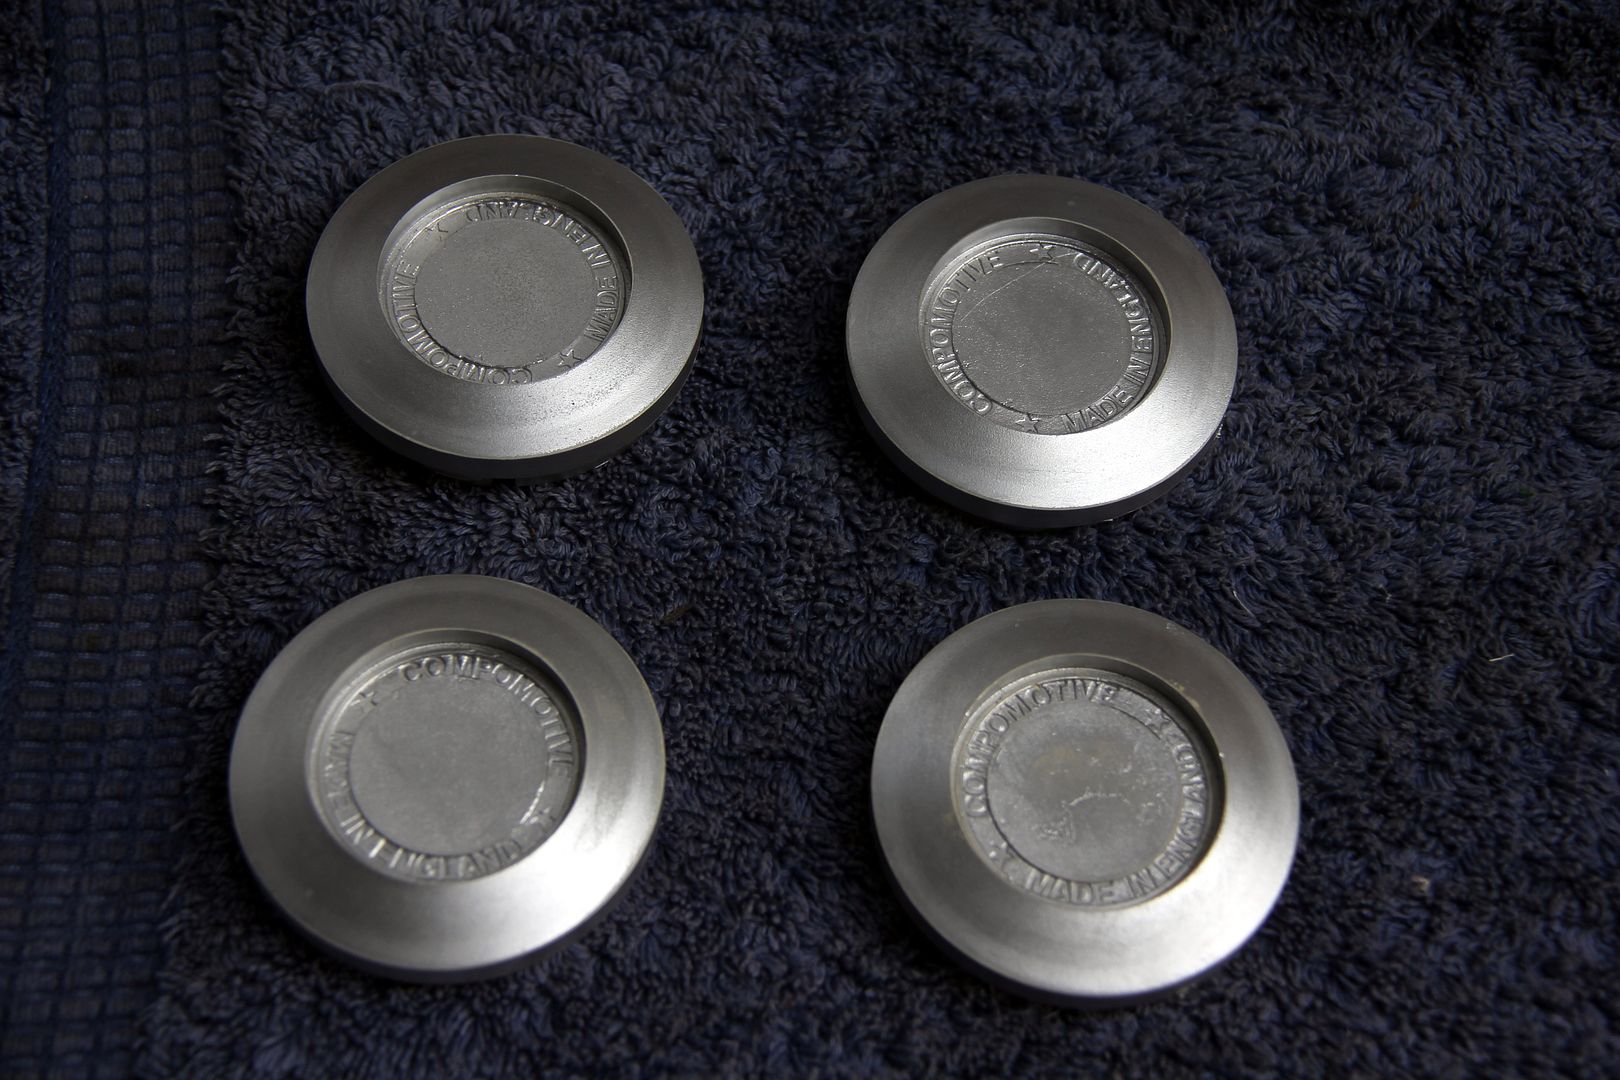
after a bit of a chore trying to colour-match the Compomotive anthracite colour ... basically involved a black base and then a blend of three different greys and silvers to get them close. And I mean close, not perfect...
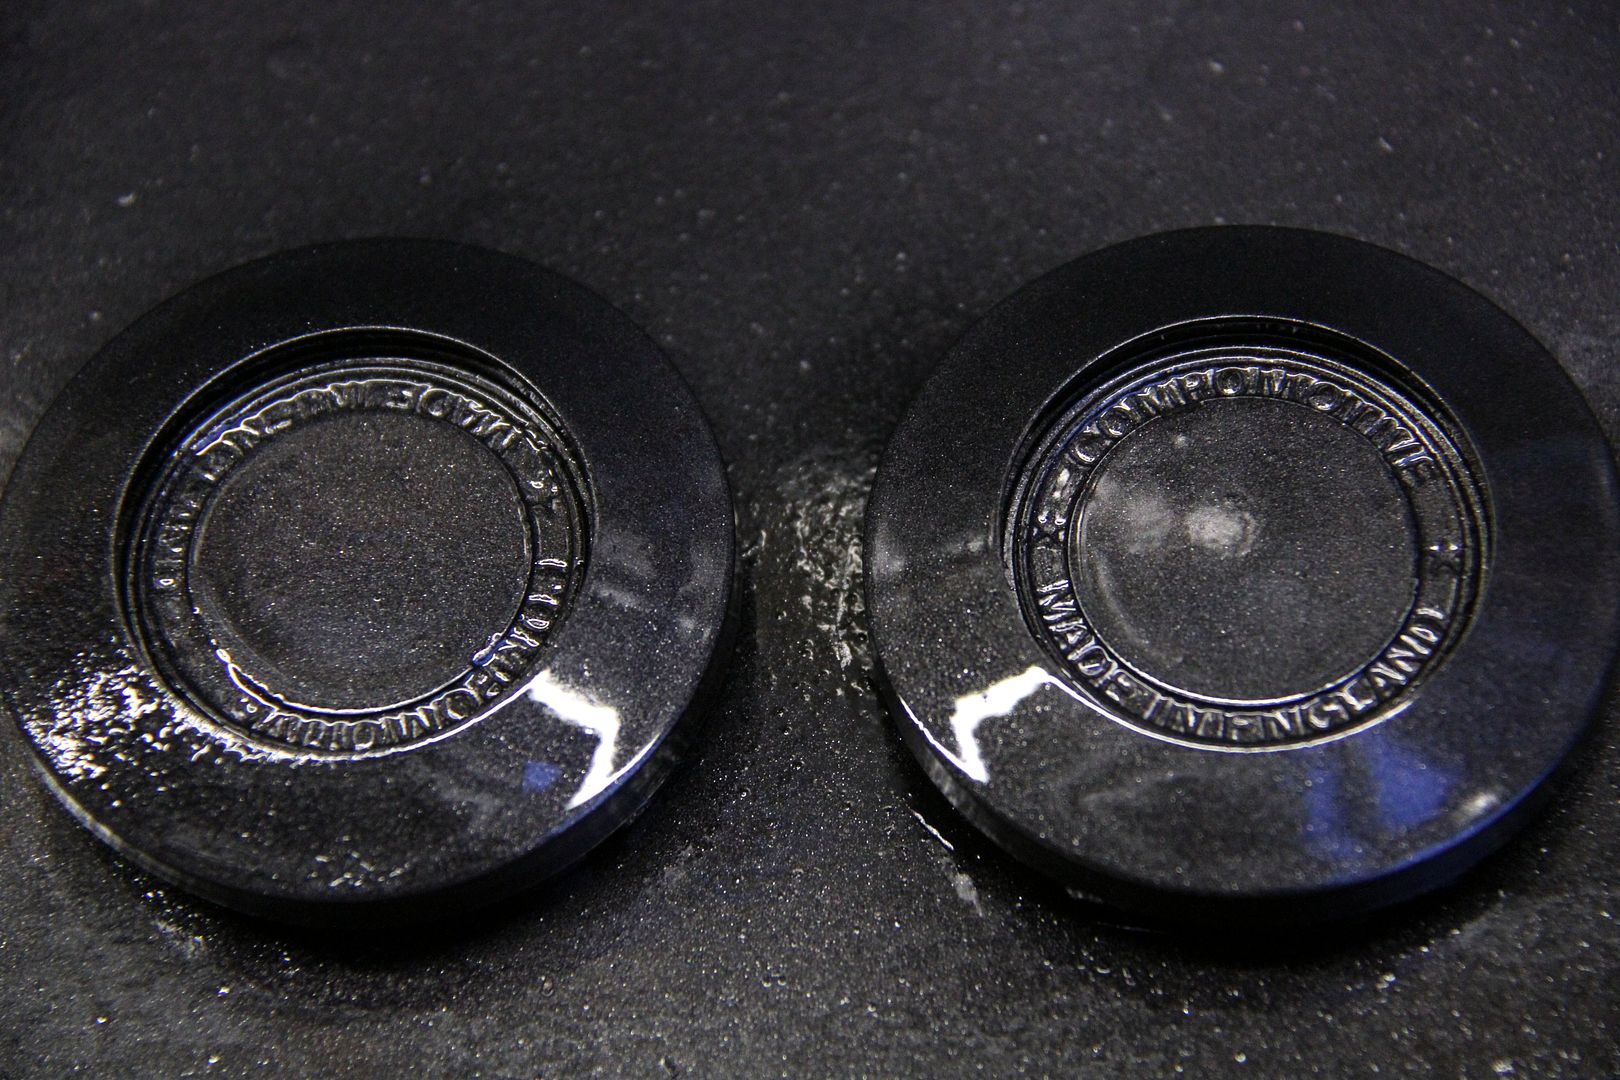
And here we are. Before;

And after;
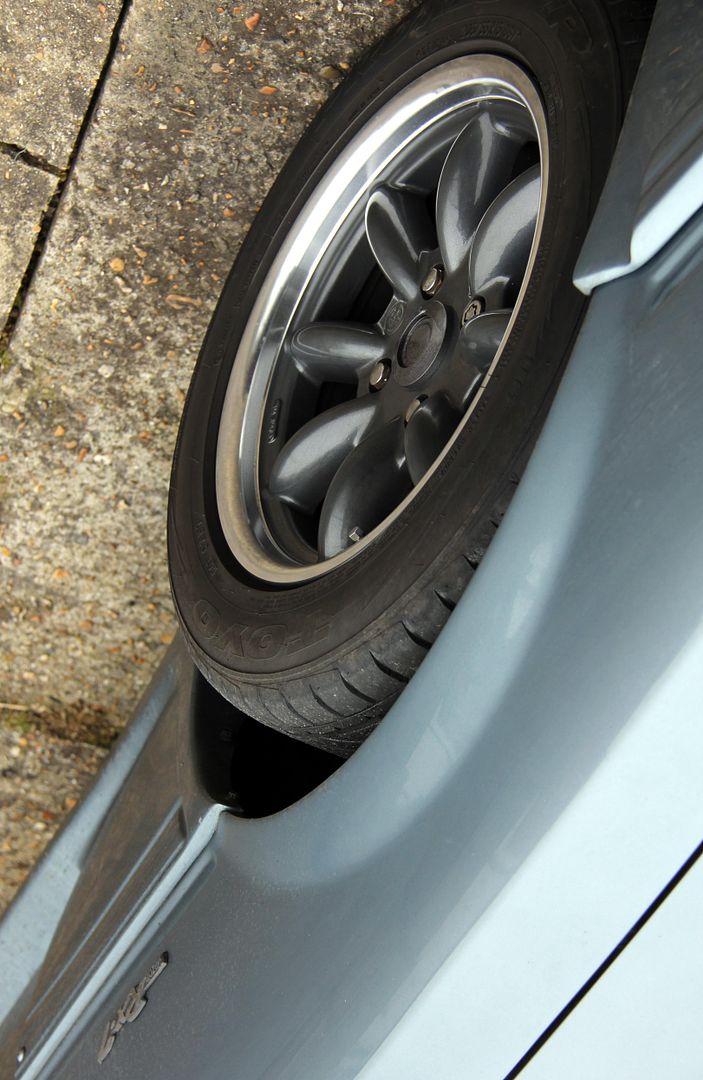
Annoyingly, I only have two of the little "M" Mazda decals I got from a mate, and he no longer has his sticker-making gear so I've no hope of finding any in the right size. I have an idea of a nifty way to add a little logo to the centre, but I've no money to spend on car stuff this month so it'll have to wait for now. And may prove disastrous anyway, lol. I prefer them anyway but as always I'm happy to hear opinions
And that's it for the moment. I've been working hard on an aspect of the car that I feel has always let it down, and it's been a surprisingly long-winded and involved undertaking. Nearly finished it though, so if all goes well I'll be doing another update on how that turned out soooooon...
Cheers for looking in as always. Stay tuned, groovers
In the seemingly never-ending quest to sort out my windscreen washers, the next thrilling instalment coming up! Despite my nice new shiny tank the actual jets seemed very feeble, which was annoying with a brand new pump as well. They ought to be good for squirting passing cyclists and such, but all I got was a lacklustre blurble up the bottom of the screen. Further investigation revealed the cause of the problem

Oh yeah, that'll be the problem then. I hadn't bothered swapping out the jet lines and connectors because I figured "what can go wrong with them" after all. Seems quite a bit. The Y-piece had completely given up the ghost and was mostly filling the scuttle with washer fluid. The lines were hard and brittle and split in a few places. I guess they'd been OK as long as the atrophied and tired thirty-year-old pump was on there but the lusty new one had proved too much for the geriatric components. Which in actual fact might have proved a blessing in disguise since if I hadn't been forced to replace the lines and Y-piece after all I'd possibly never have spotted

Gahhhhh! At first it looked just like a nasty rust patch, but closer inspection revealed that it was a proper full-blown hole. Mazda stuck a sheet of rubberised anti-boom road noise damping mat to the hollow under the scuttle, and it appears this had cracked up and allowed water to get in under and rust away the steel. Possibly the washer fluid hadn't helped, God knows how long that had been leaking into there. Obviously it needed treating, so I got in as best I could with the wire brushes (access is a total pig, despite what these photos might imply)

You can see there's a definite hole right through just beside what I assume is one of the captive fixings through to the dashboard. You can see through to the floor and inside of the glovebox. I hope I might be lucky and caught this just as it was starting, I've never noticed any signs of water ingress in the cabin. But then, I've not really been looking. Anyway, loads of rust convertor later

and then a blow-over with some paint to keep it from going again

It's not ideal but it'll do for the moment. It'll be a real turdycurse to get in with a welder and replace the steel, so it'll have to wait until the weather (and my finances) improve. For now it's got a polythene sheet sealed down over the top (I know, I know) to stop it getting any worse, hopefully, and that'll have to suffice until I can get it sorted properly.
Anyhooo, now I could get on with the original task, which was sorting the bleedin washers out. I just bought a universal washer setup from Car Builder Solutions because this gave me everything I'd need as well as a rather smaller tank to replace the humongous behemoth in the boot, lol. So, all nice new lines and Y-piece to replace the brown and crackly old tat

and I even replaced the funny old round Mazda washer jets with some new aerodynamic ones (lol) since they came in the kit figured I may as well use them

They are now more than squirty enough to douse any passing pedestrians, following motorcyclists, undertaking cyclists, horse riders and all the other road users we assume have less right than us to be there because they get away without road tax or stopping at red lights.
(Note: some of the above may not be 100% accurate....)
And since I had a nice new kit to utilise, I took the opportunity to swap the aforementioned bulbous rear tank. New one is much more slimline but slightly taller so still holds plenty but doesn't intrude into the boot as much

Only slight irritation was having to extend the wiring to the pump as the original loom was about 3" too short. And as your missus will tell you, sometimes three inches makes all the difference!

So, with the washers FINALLY laid to rest (please, God) I could get one with something a bit more glamorous. Certain elements have already pointed out that the expansion tank in the engine bay is now the only obvious plastic bit left, and that it was only a matter of time. Yep, it's that time!

I got this for Chrimble, what at first glance might be the most manly hip flask ever. In fact it's an radiator expansion tank from the same line at the incomparable Car Builder Solutions as the washer tank. It wasn't going to bolt straight on, though. The stock tank has a single tube to it, which goes into the lid and has a dip tube that sits in the coolant an inch or so above the bottom of the tank. This, as certain wise rotary experts have surmised, is because the nature of a rotary engine promotes a lot of sediment in the coolant. The motor is basically a giant Scooby Doo sandwich made from plates of alloy and iron alternated. The dissimilar metals swap ions over time and the result is a kinda rusty gungy solute that precipitates out in various points of the cooling system. One of these is the expansion tank, and Mazda's way of avoiding it getting sucked back into the system is the dip tube that only samples from the coolant rather than the base of the tank where the sediment deposits form. Simple yet clever, like all the best ideas.
However, my tank had a side-entry union on the neck and one at the very base. Neither of these were going to be any real use in my application. However, rather than just hack them off and render the tank useless in any future different configurations, I decided to blank them instead.

This was the simple matter of tapping a thread to accept an M5 bolt, plenty of PTFE tape and then for belt-and-braces, a silicone cap to go over the top. Job jobbed. However, this meant I still needed a union for the coolant line from the pressure neck on the radiator;

It's at this point that I became an expert on pipe fittings, lol. Took me ages to find a combination that would suit, basically because none of the male to female threads were in quite the right orientation. However, I ended up with a Sytec fuel union and a female reducer for the inside... 1/8th NPT which I would normally avoid because the idea of a tapered thread might well be an American idea of a joke (or world domination, not sure which) but it's a right royal PITA to hand-tap a thread and get it exactly right. Don't get me started on my personal campaign for standardisation across the eight or ten different types of pipe thread in the world, lol. Anyhoo, ended up with this

which seemed to work well and remain leak-proof. Hurrah. Then all it needed was a dip tube. This is one hastily made from an old Scottoiler bottle. I love titting around in a Blue Peter stylee, making use of old tat and re-imagining it to do something it was never meant to be

The final physical mod to the tank was to put in a sight glass, because one of the things you need with an expansion tank is to see if it's full, empty or fluctuating. One of these universal jobbies like you get off catch tanks was perfickt for the task

And then it was down to the tedious and laborious task of polishing the tank up to a nice shine. In between doing this, when I simply couldn't face any more sanding for a bit, I got on with making a bracket to hold it. Made out of 6mm ally plate, which is about as thick as I can easily(ish) bend with only my feeble wrists and some molegrips, lol

I had to pause to repair my rivnut pulling tool, as an M6 Stainless nutsert had proved too manly for the cast alloy handles and one had sheared off completely. Grrrr! Not the prettiest of repairs admittedly, but some steel plate, bolts and some self-amalgamating tape seem to have done the trick. And it was cheaper than 60-odd quid for a new one

So, here's the final article, all polished up and sat next to the original Mazda one for a bit of contrast. Lovely

And then some satin black on the bracket and it all fitted (pleasingly) as if it was made to go there. Which it kinda was, lol

I also included a nifty dry break coupler in-line that I had left over from an old bike. This is a neat little doodad that flows freely in either direction but just press the catch on top and it springs apart, self-sealing both ends without losing a single drop. Makes it much easier to take the cap off without having to get a screwdriver and undo the hose finisher and all that malarkey

Finally, wheel centre caps. I think I've been through four different versions of these and never quite found The Ones. I never like the stock ones that came with the wheels, they're just too angular-sided, but they were the best of a bad lot. So I was pretty pleased to find these floating by on the muddy waters of eBay

after a bit of a chore trying to colour-match the Compomotive anthracite colour ... basically involved a black base and then a blend of three different greys and silvers to get them close. And I mean close, not perfect...

And here we are. Before;

And after;

Annoyingly, I only have two of the little "M" Mazda decals I got from a mate, and he no longer has his sticker-making gear so I've no hope of finding any in the right size. I have an idea of a nifty way to add a little logo to the centre, but I've no money to spend on car stuff this month so it'll have to wait for now. And may prove disastrous anyway, lol. I prefer them anyway but as always I'm happy to hear opinions

And that's it for the moment. I've been working hard on an aspect of the car that I feel has always let it down, and it's been a surprisingly long-winded and involved undertaking. Nearly finished it though, so if all goes well I'll be doing another update on how that turned out soooooon...
Cheers for looking in as always. Stay tuned, groovers